


CHAPTER 8
Installing the Switch
•
Installing and Connecting an EX8208 Switch on page 125
•
Unpacking an EX8200 Switch on page 126
•
Parts Inventory (Packing List) for an EX8208 Switch on page 130
•
Installing Adjustable Mounting Brackets in a Rack or Cabinet for an EX8200
Switch on page 132
•
Installing the Power Cord Tray in a Rack or Cabinet for an EX8200 Switch on page 135
•
Mounting an EX8208 Switch on a Rack or Cabinet on page 138
•
Mounting an EX8208 Switch on a Rack or Cabinet Using a Mechanical Lift on page141
•
Mounting an EX8208 Switch on a Rack or Cabinet Without Using a Mechanical
Lift on page 143
Installing and Connecting an EX8208 Switch
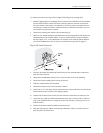
TheEX8208switchchassisisarigidsheet-metalstructurethathousestheotherhardware
components such as Switch Fabric and Routing Engine (SRE) modules, a Switch Fabric
(SF) module, and line cards. The switch ships in a cardbox box that has a two-layer
wooden pallet base. The switch chassis is bolted to the pallet base.
To unpack an EX8208 switch, follow instructions in “Unpacking an EX8200 Switch” on
page 126.
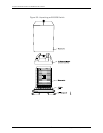
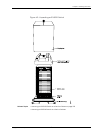
You can install an EX8208 switch in a 19-in. equipment rack or cabinet by using the
front-mountingbracketattached tothe chassis.Toinstall the switch in a rackor cabinet,
follow the instructions in “Mounting an EX8208 Switch on a Rack or Cabinet Using a
MechanicalLift”onpage141or“MountinganEX8208SwitchonaRackorCabinetWithout
Using a Mechanical Lift” on page 143.
To connect an EX8208 switch to earth ground, follow instructions in “Connecting Earth
Ground to an EX Series Switch” on page 167.
To connect power to the switch chassis, follow instructions in “Connecting AC Power to
an EX8200 Switch” on page 173.
To connect and configure the switch, follow instructions in “Connecting and Configuring
an EX Series Switch(CLI Procedure)”on page 190 or “Connecting and Configuringan EX
Series Switch (J-Web Procedure)” on page 192.
125Copyright©2010, JuniperNetworks, Inc.