


To connect the switch to a network for out-of-band management, follow instructions in
“ConnectinganEXSeriesSwitchtoaNetworkforOut-of-BandManagement”onpage187.
To connect the switch to a management console, follow instructions in “Connecting an
EX Series Switch to a Management Console” on page 181.
Related Topics Rack Requirements for an EX8208 Switch on page 97•
• Cabinet Requirements and Specifications for an EX8208 Switch on page 100
• ClearanceRequirementsforAirflowandHardwareMaintenanceforanEX8208Switch
on page 101
• Chassis Lifting Guidelines for EX8200 Switches on page 276
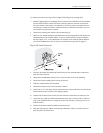
Unpacking an EX8200 Switch
After you prepare the installation site as described in “Site Preparation Checklist for an
EX8200 Switch” on page 91, you may unpack the switch.
NOTE: Theswitchismaximallyprotectedinsidetheshippingbox.Donotunpackituntil
you are ready to begin installation.
Ensure that you have the following parts and tools available to unpack the EX8200
switch:
•
A 7/16-in. or 11-mm open-end or socket wrench to remove the bracket bolts from the
shipping pallet
•
A box cutter or packing knife to slice open the tape that seals the top of the box
The switch ships in a cardboard box that has a two-layer wooden pallet base with foam
cushioning between the layers. The switch chassis is bolted to the pallet base.
The EX8208 chassis ships with the Switch Fabric and RoutingEngine (SRE) module(s),
SwitchFabric(SF)module,fantray,andpowersuppliesfortheconfigurationyouordered
already installed. Any line cards ordered ship separately.
TheEX8216chassisshipswiththeRoutingEngine(RE)module(s),SFmodules,fantrays,
and power supplies for the configuration you ordered already installed. Any line cards
ordered ship separately.
See “EX8208 Switch Configurations” on page 6 and EX8216 Switch Configurations for
information about base configurations and redundant configurations.
Copyright ©2010,Juniper Networks,Inc.126
CompleteHardwareGuide forEX8208 EthernetSwitches