


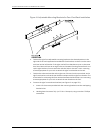
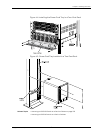
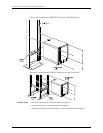

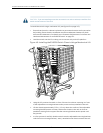
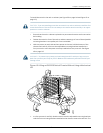

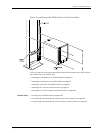


Mounting an EX8208 Switch on a Rack or Cabinet Using a Mechanical Lift
Because of the switch'ssize and weight, westronglyrecommend using a mechanical lift
to install the switch.
NOTE: For instructions on installing a switch without using a mechanical lift, see
“Mounting an EX8208 Switch on a Rack or Cabinet Without Using a MechanicalLift”
on page 143.
CAUTION: Do not install line cards in the chassis until after you mount the chassis
securely on a rack or cabinet.
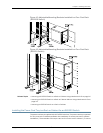
CAUTION: Before front-mounting the switch on a rack or cabinet, have a qualified
technicianverifythattherackorcabinetisstrongenoughtosupporttheswitch'sweight
and is adequately supported atthe installation site.
Before you install the switch:
•
Prepare the site for installation as described in “Site Preparation Checklist for an
EX8200 Switch” on page 91.
•
Ensure the site has adequate clearance for both airflow and hardware maintenance
as described in “Clearance Requirements for Airflow and Hardware Maintenance for
an EX8208 Switch” on page 101.
•
Unpack the switch as described in “Unpacking an EX8200 Switch” on page 126.
•
In a two-post rack, install the power cord tray at the desired position (see “Installing
the Power Cord Tray in a Rack or Cabinet for an EX8200 Switch” on page 135). The lip
of the power cordtraywill support the frontof the chassis when you install the switch
in the two-post rack.
•
In a four-post rack, install the adjustable mounting brackets at the desired position
(see “Installing Adjustable Mounting Brackets in a Rack or Cabinet for an EX8200
Switch” on page 132). Optionally, you can also install the power cord tray and use it to
manage the power supply cords.
•
Review chassis lifting guidelines described in “Chassis Lifting Guidelines for EX8200
Switches” on page 276.
Ensure that you have the following parts and tools available to install the switch:
•
A mechanical lift
•
24 mounting screws appropriate for your rack
•
A Phillips (+) screwdriver, number 2 or number 3, depending on the size of your rack
mounting screws
141Copyright©2010,Juniper Networks,Inc.
Chapter8:Installing theSwitch