


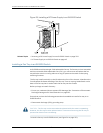


1. Attach the electrostatic discharge (ESD) grounding strap to your bare wrist, and
connect the strap to the ESD point on the chassis.
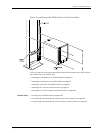
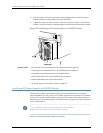
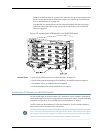
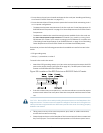
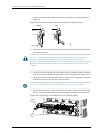
2. Hold the handle of the fan tray with one hand and support the weight of the tray
with the other hand. Align the tray with the fan tray guides on the fan tray slot. Slide
in the fan tray until it is fully seated in the chassis.
You will hear a distinct click sound when the spring-loaded latch locks into the
corresponding hole on the strike plate below the fan tray.The latch must be fully
engaged in the corresponding hole for the fan tray to be securely installed.
Figure 54: Installing a Fan Tray in an EX8208 Switch
Related Topics Removing a Fan Tray from an EX8208 Switch on page 211•
• Cooling System and Airflow in an EX8208 Switch on page 53
• Field-Replaceable Units in an EX8208 Switch on page 23
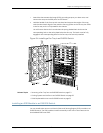
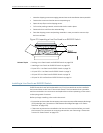
Installing an SRE Module in an EX8208 Switch
You can install either one or two Switch Fabric and Routing Engine (SRE) modules in an
EX8208 switch. The SRE modules install horizontally in the front of the chassis in the
slots labeled SRE0 and SRE1.
155Copyright©2010, JuniperNetworks, Inc.
Chapter9:Installing SwitchComponents