


WARNING: Do not leave a fiber-optic transceiver uncovered except when inserting or
removing a cable. The rubber safety cap keeps the port clean and prevents accidental
exposure to laser light.
4. Cover the fiber-optic cable connector with the rubber safety cap.
Related Topics Connecting a Fiber-Optic Cable to an EX Series Switch on page 165•
• Removing a Transceiver from an EX Series Switch on page 222
• Maintaining Fiber-Optic Cables in EX Series Switches on page 231
• Optical Interface Support in EX2200 Switches
• Optical Interface Support in EX3200 and EX4200 Switches
• Optical Interface Support in EX4500 Switches
• Optical Interface Support in EX8200 Switches on page 60
Removing a Transceiver from an EX Series Switch
The transceivers for EX Series switches are hot-removable and hot-insertable
field-replaceable units (FRUs): Youcan remove and replace them without powering off
the switch or disrupting switch functions.
Before you begin removing a transceiver from an EX Series switch, ensure that you have
taken the necessary precautions for safe handling of lasers (see “Laser and LED Safety
Guidelines and Warnings for EX Series Switches” on page 269).
Ensure that you have the following parts and tools available:
•
An antistatic bag or an antistatic mat
•
Needlenose pliers
•
Rubber safety caps to cover the transceiver and fiber-optic cable connector
•
A dust cover to cover the port
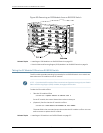
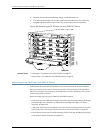
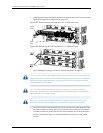
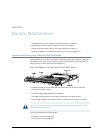
Figure91onpage223showshowtoremoveanSFPtransceiver.Theprocedureisthesame
for all transceiver types.
To remove a transceiver from an EX Series switch:
1. Place the antistatic bag or antistatic mat on a flat, stable surface.
2. Label the cable connected to the transceiver so that you can reconnect it correctly.
WARNING: Do not look directly into a fiber-optic transceiveror into the ends of
fiber-optic cables. Fiber-optic transceivers and fiber-optic cables connected to
transceiversemit laser light that can damage your eyes.
Copyright ©2010,Juniper Networks,Inc.222
CompleteHardwareGuide forEX8208 EthernetSwitches