


•
A Phillips (+) screwdriver, number 1, to remove the power supplies from the chassis if
you are mounting the switch without using a mechanical lift
•
24 mounting screws appropriate for your rack
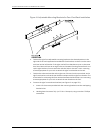
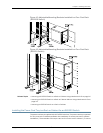
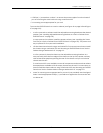
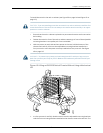
To mount the EX8208switch on a rackor cabinet (see Figure46 on page 140 and Figure
47 on page 140):
1. Inafour-postrackorcabinet,installtheadjustablemountingbracketsatthedesired
position (see “Installing Adjustable Mounting Brackets in a Rack or Cabinet for an
EX8200 Switch” on page 132).
In a two-post rack or cabinet, install the power cord tray (see “Installing the Power
Cord Tray in a Rack or Cabinet for an EX8200 Switch” on page 135). The power cord
tray is optional for four-post rack installation.
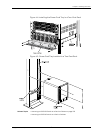
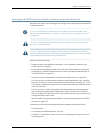
2. Liftthechassisintotherackusingamechanicallift.Forinstructionsonhowtoinstall
the chassis using a mechanical lift, see “Mounting an EX8208 Switch on a Rack or
Cabinet Using a Mechanical Lift” on page 141.
In a four-post rack, place the chassis on the adjustable mounting brackets. In a
two-post rack, place the front edge of the chassis on the lip of the power cord tray
with at least three people supporting the rear of the chassis until you can bolt the
chassis into the rack.
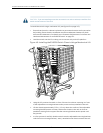
If a mechanical lift is not available, remove all components and ensure that at least
three people are available to lift the empty chassis into the rack. For instructions on
howtoinstallthe chassiswithout using a mechanicallift, see“Mounting an EX8208
Switch on a Rack or Cabinet Without Using a Mechanical Lift” on page 143.
3. Insert 24 mounting screws appropriate for your rack (not provided) into the aligned
holes. Use the appropriate Phillips (+) screwdriver to tighten the screws to the rack
or cabinet rail.
139Copyright©2010,Juniper Networks, Inc.
Chapter8:Installing theSwitch