


adjustable mounting brackets ensure that the holes in the front-mounting brackets
attached to the chassis align with the holes in the rack rails.
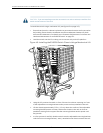
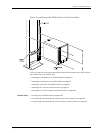
In a two-post rack, carefully slide the switch over the lip of the power cord tray and
into the rack. Push the bottom of the chassis so that the front-mounting bracket is
flush with the front of the rack.
5. Install a mounting screw into each of the open front-mounting holes aligned with
the rack, starting from the bottom.
6. Visually inspect the alignment of the chassis. If the chassis is installed properly in
therack,allthemountingscrewsononesideoftherackarealignedwiththemounting
screws on the opposite side and the switch is level.
7. After ensuring that the switch is aligned properly, tighten the screws.
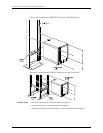
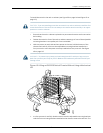
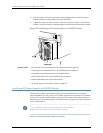
Figure 50: Installing an EX8208 Switch in a Four-Post Rack
Copyright ©2010,Juniper Networks,Inc.146
CompleteHardwareGuide forEX8208 EthernetSwitches