


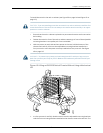


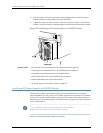


10. Push the captive screw into the power supply faceplate. Ensure that the screw is
seated inside the corresponding hole on the faceplate.
11. Tighten the captive screw by turning it clockwise using the Phillips (+) screwdriver,
number1. Whenthescrewiscompletelytight,the latchlocksintotheswitchchassis.
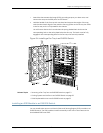
Figure 52: Installing an AC Power Supply in an EX8200 Switch
Related Topics Removing an AC Power Supply from an EX8200 Switch on page 207•
• Calculating Power Requirements for an EX8208 Switch on page 114
• Calculating Power Requirements for an EX8216 Switch
• Field-Replaceable Units in an EX8208 Switch on page 23
• Field-Replaceable Units in an EX8216 Switch
• AC Power Supply in an EX8200 Switch on page 40
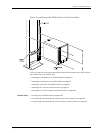
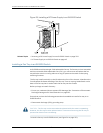
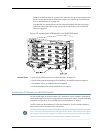
Installing a DC Power Supply in an EX8200 Switch
The DC power supply in an EX8200 switch is a hot-removable and hot-insertable
field-replaceable unit (FRU). Up to six DC powersupplies can be installed in an EX8200
switch. All DC power supplies install in the front of the chassis in the slots provided at
thebottom.See“SlotNumberingforanEX8208 Switch”onpage13and SlotNumbering
for an EX8216 Switch.
NOTE: EX8208 switches support 2000 W DC power supplies.
EX8216 switches support 3000 W DC power supplies.
Before you install a DC power supply in the switch:
Copyright ©2010,Juniper Networks,Inc.152
CompleteHardwareGuide forEX8208 EthernetSwitches