


NOTE: You must providemounting screws that are appropriate for your rack to
front-mount the chassis on a rack or a cabinet.
For two-post rack installation, you need 28 screws: 24 screws to attach the
front-mounting bracket “ears” that come installed on the chassis tothe front of the
rackand 4 screws to install the power cord tray.(The power cord tray is mandatory for
two-post rack installation.)
For four-post rack installation, you need either 40 or 44 screws: 24 screws to attach
thefront-mountingbracket“ears”thatcomeinstalled onthe chassistothefront ofthe
rack,16 screws to attach the adjustable mounting brackets to the rack, and 4 screws
if you install the optional power cord tray.
Related Topics Unpacking an EX8200 Switch on page 126•
• EX8208 Switch Hardware Overview on page 3
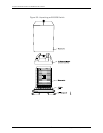
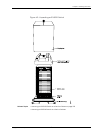
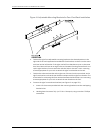
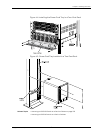
Installing Adjustable Mounting Brackets in a Rack or Cabinet for an EX8200 Switch
To mount the switch on a four-post rack or cabinet, you must first install the adjustable
mountingbracketsintherackorcabinet.(Theremainderofthistopicuses“rack”tomean
“rackorcabinet.”)TheEX8200switchcomeswithafour-piecesetofadjustablemounting
brackets that supports the chassis in the rack.
NOTE: The adjustable mounting bracketsare not for installation in two-postracks.
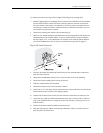
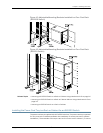
The four adjustable mounting bracket pieces are:
•
1 left front adjustable mounting bracket. The bracket is labeled “LEFT FRONT” on the
side of the bracket that faces the interior of the rack, near the holes for attaching the
bracket to the rack.
•
1 right front adjustable mounting bracket. The bracket is labeled “RIGHT FRONT” on
the side of the bracket that faces the interior of the rack, near the holes for attaching
the bracket to the rack.
•
2 rear adjustable mounting brackets. These brackets are labeled “REAR” on the side
ofthebracketthatfacestheinterioroftherack,neartheholesforattachingthebracket
totherack.Therearbracketsareinterchangeable;youcanuseeitheroftherearbrackets
with the right or left front adjustable mounting bracket.
Ensure that you have the following parts and tools available to install the adjustable
mounting brackets:
•
APhillips(+)screwdriver,number1,2,or3,dependingonthesizeofyourrackmounting
screws
•
A Phillips (+) screwdriver, number 2 to install the screws that connect the rear and
front mounting brackets
Copyright ©2010,Juniper Networks,Inc.132
CompleteHardwareGuide forEX8208 EthernetSwitches