


DEFINITY Enterprise Communications Server Release 8.2
Upgrades and Additions for R8r
555-233-115
Issue 1
April 2000
Upgrading R5si/R6si to R8r EPN and Adding Memory
3-14Release 5/6si to Release 8r
3
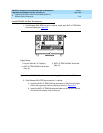
Disconnect Power and Ground
1. Disconnect the cabinet power cords from the rear of each cabinet.
2. Disconnect the 10 AWG (#25) (2.6 mm
2
) coupled bonding conductor wire.
3. Disconnect the 6 AWG (#40) (4.1 mm
2
) cabinet ground wire from the
ground bar in the cabinet.
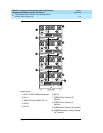
Install Emergency Transfer Ground Wire
!
CAUTION:
To avoid contaminating single-point ground, do not connect the ground
strap while the system is powered up.
1. Connect a 10 AWG (#25) (2.6 mm
2
) wire either to pin 49 of the connecting
block or to pin 49 of the CAP (cable access panel) associated with the
emergency transfer panel.
2. Route the other end of the wire to an approved ground and connect.
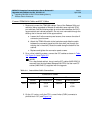
Disconnect Equipment and Cables
1. Disconnect all of the connector cables attaching to the PPN.
2. Disconnect the PC from the TERM connector.
3. Remove the ground plate(s) from between all of the PPN cabinets.
4. Remove the top and bottom rear covers from all of the PPN cabinets.
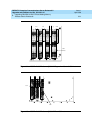
Remove Circuit Packs
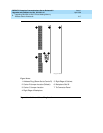
1. Label each port circuit pack in the control cabinet with its slot number.
2. Remove all circuit packs and power units from the control cabinet. Store
the circuit packs in the static-proof packaging.
NOTE:
If a TN756 tone-detector/generator was removed from the Release
5/6si, a new Release 8r tone clock (TN2182B) replaces this circuit
pack. The TN2182B Tone-Clock replaces the tone detector circuits
on the TN756. A TN2182B eliminates the need for a TN748B.