


Installation 2 - 15
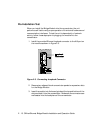
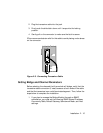
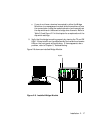
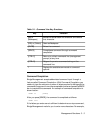
2. Plug the transceiver cable into the jack.
3. Firmly push the slide latch down until it snaps into the locking
position.
4. Gently pull on the connector to make sure the latch is secure.
3Com recommends strain relief for this cable to avoid placing undue stress
on the connector.
Figure 2-5. Connecting Transceiver Cable
Setting Bridge and Channel Parameters
Before selecting the channels that the module will bridge, verify that the
transceiver cable connection (if used) is secure at both ends of the cable
and that the transceiver is on a valid terminated segment. Then, follow the
steps below to complete the installation.
1. If you plan to manage the Bridge Module through an SNMP
workstation, you must set the following SNMP values: IP address,
Community Table, Default Gateway, Subnetwork Mask, and Alert
settings.
AUI
RS-232
SERIAL