


Document No. 10-300077, Issue 2 13-13
Configuring Access Lists
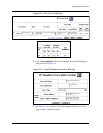
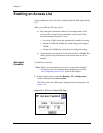
2. Select Enable from the Enable field pull-down menu to filter inbound
traffic.
3. Select the name of the access list to be used for filtering when IP access
control is enabled from the IP Access List field pull-down menu.
4. Click APPLY to save your changes.
CLI Command To activate an access list using the CLI, enter the following command in
configure mode:
(configure)# access-group <access-list-name>
To disable an access list using the CLI command, enter the following
command in configuration mode:
(configure)# no access-group <access-list-name>
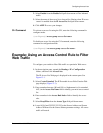
Example: Using an Access Control Rule to Filter
Web Traffic
To configure your switch to filter Web traffic to a particular Web server:
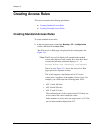
1. In the navigation pane, expand the Routing > IP > Configuration
folders, and then click Access Lists.
The IP Access List Web page is displayed in the content pane. See
Figure 13-1.
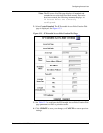
2. Select Create Extended. The IP Extended Access Rule Creation Web
page displays (Figure 13-3).
3. Enter a number between 100 and 199 (or Alphanumeric) (for extended
ACL) in the Access List Name field to identify your new access control
list.
4. Enter a number in the Access Rule Index field to identify the access
rule.
5. Select Deny/Filter from the Access Type field pull-down menu.
6. Leave 0.0.0.0 and 255.255.255.255 as the Source Address and Source
Address Wildcard for the Source Subnet parameter settings. All source
traffic will match.