


2 - 11
Chapter 2 Operation of Diag.
4.1 Details of ESS diagnosis
This section describes how to perform each test of the ESS Diag in detail.
4.1.1 Executing ESS diagnosis
1) Turn off the power.
2) Turn on the power while holding down “ ” and “ ” keys.
3) Release the fingers from these keys when “Diagnosing...” is displayed.
4) The “Customer Mode” and “ESS Diag” are displayed. (Entered the Diag. mode.)
5) Press “ 3 ” key.
6) Press “ ” or “ ” key to select the test item.
7) Press “ 3 ” key twice to execute the test.
To exit the test or to returning to one step higher menu, press “CANCEL” key.
4.1.2 All Test
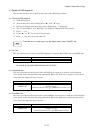
This test executes the all tests of the ESS diagnostic except the MAC+PHY test and PANEL test.
***:Displays the test name that became error.
(CodeROM/FontROM/EEPROM/DRAM/ASIC/IOT/HD)
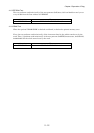
4.1.3 CodeROM Test
This test calculates the checksum of the each ROM, and compares it with the valid checksum
value stored in the corresponding chip beforehand. When the checksum is identical to the stored
value, this test judges the chip is normal.
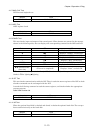
4.1.4 FontROM Test
This test calculates the checksum of the each FontROM, and compares it with the valid checksum
value stored in the corresponding chip beforehand. When the checksum is identical to the stored
value, this test judges the chip is normal.
Normal Error
CHECK OK *** ERROR
Normal Error
CHECK OK
CodeROM #* ERROR
S=xxxx V=yyyy
(xxxx:calculated value yyyy:ROM stored value *:0,1)
Normal Error
CHECK OK
FontROM ERROR
S=xxxx V=yyyy
(xxxx:calculated value yyyy:ROM stored value)