


3 - 52
Chapter 3 Removal and Replacement Procedures (RRPs)
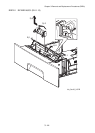
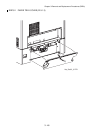
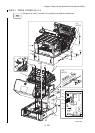
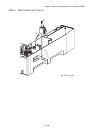
RRP3.3 PAPER FEEDER (PL3.1.7s)
[Replacement]
When placing the upper unit of printer on the PAPER FEEDER, take care not to catch the
harness of the PAPER FEEDER between them.
1) Place the upper unit of printer on the PAPER FEEDER.
2) Attach the upper unit of printer using three long screws (gold).
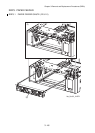
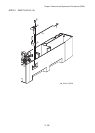
3) Fix the upper unit of printer with five screws (silver, 6 mm) and four screws (silver, tap, 10
mm).
4) Attach the connector (P/J47) of PAPER FEEDER to MACHINE CONTROL UNIT (MCU) of
the printer.
5) Attach the CORE to the harness of the connector (P/J17), connect the connector to the
MACHINE CONTROL UNIT (MCU).
6) Attach the all connectors on LOW VOLTAGE POWER SUPPLY (LVPS).
7) Attach SUPPORT LINK SW using a screw (silver, 6mm).
8) Attach BRACKET TEMP (PL9.1.19). (RRP9.8)
9) Attach HIGH VOLTAGE POWER SUPPLY (HVPS). (RRP9.9)
10) Attach REGISTRATION CHUTE ASSEMBLY (RRP4.3)
11) Attach REGISTRATION ASSEMBLY. (RRP4.6)
12) Attach COVER ASSY REAR (PL1.1.17). (RRP1.5)
13) Attach LEFT SIDE COVER (PL1.1.30). (RRP1.12)
14) Attach RIGHT SIDE COVER (PL1.1.20). (RRP1.7)
15) Attach TOP COVER FRAME (PL1.1.4). (RRP1.1)
16) Insert 500 SHEET PAPER TRAY into the printer.