


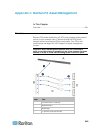
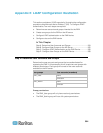


Appendix E: LDAP Configuration Illustration
356
Step C. Configure LDAP Authentication on the EMX Device
You must enable and set up LDAP authentication properly on the EMX
device to use external authentication.
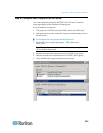
In the illustration, we assume:
The DNS server settings have been configured properly. See
Modifying the Network Settings (on page 80) and Role of a DNS
Server (on page 84).
The AD server's domain name is techadssl.com, and its IP address
is 192.168.56.3.
The AD protocol is NOT encrypted over SSL.
The AD server uses the default TCP port 389.
Anonymous bind is used.
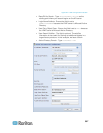
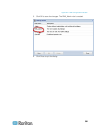
To configure LDAP authentication:
1. Choose Device Settings > Security > Authentication. The
Authentication Settings dialog appears.
2. Select the LDAP radio button to activate remote LDAP/LDAPS
server authentication.
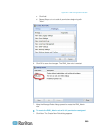
3. Click New to add an LDAP/LDAPS server for authentication. The
"Create new LDAP Server Configuration" dialog appears.
4. Provide the EMX with the information about the AD server.
IP Address / Hostname - Type the domain name
techadssl.com or IP address 192.168.56.3.
Important: Without the SSL encryption enabled, you can type either
the domain name or IP address in this field, but you must type the
fully qualified domain name if the SSL encryption is enabled.
Use settings from LDAP server - Leave the checkbox deselected.
Type of LDAP Server - Select "Microsoft Active Directory" from
the drop-down list.
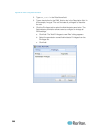
LDAP over SSL - Have the checkbox deselected since the SSL
encryption is not applied in this example.
Port - Ensure the field is set to 389.
SSL Port and Server Certificate - Skip the two fields since the
SSL encryption is not enabled.
Use Bind Credentials - Do NOT select this checkbox because
anonymous bind is used.
Bind DN, Bind Password and Confirm Bind Password -- Skip the
three fields because anonymous bind is used.