


June 2005 © TOSHIBA TEC e-STUDIO281c/351c/451c ADJUSTMENT
3 - 5
3
3.3 Performing Image Quality Control
(1) When unpacking
Prior to image dimensional adjustment, perform the “Automatic initialization of image quality con-
trol (05-396)” procedure.
(2) When any of the following parts is replaced, be sure to perform the “Automatic initialization of
image quality control (05-396)” procedure.
• Photoconductive drum • Developer material • Laser optical unit
• Image quality sensor • Transfer belt • 1st transfer roller
• 2nd transfer roller • Main charger • Main charger grid
• Drum cleaning blade • Drum cleaner brush
Note: Note:
When performing "Automatic gamma adjustment" in addition, “Automatic initialization of image
quality control (05-396)” should be done first.
(3) When performing "Automatic gamma adjustment" in cases no parts written above are replaced,
do the “Forced performing of image quality closed-loop control (05-395)” procedure before "Auto-
matic gamma adjustment".
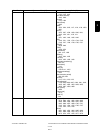
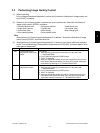
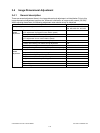
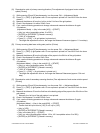
Code Item to be adjusted Contents
395 Forced performing of
image quality closed-loop
control
<Procedure>
1) While pressing [0] and [5] simultaneously, turn the power ON.
→ Adjustment Mode
2) Key in [395] and press the [START] button.
3) "WAIT" is displayed.
4) When the adjustment finishes normally, the equipment returns to the
initial state of Adjustment Mode. If an error has occurred, take appro-
priate action by referring to “5. TROUBLESHOOTING”.
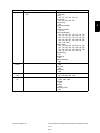
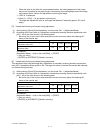
396 Automatic initialization of
image quality control
<Procedure>
1) While pressing [0] and [5] simultaneously, turn the power ON.
→ Adjustment Mode
2) Key in [396] and press the [START] button.
3) "WAIT" is displayed.
4) When the adjustment finishes normally, the equipment will return to
initial state of the Adjustment Mode. If an error has occurred, take
appropriate action by referring to “5. TROUBLESHOOTING”.