


June 2005 © TOSHIBA TEC e-STUDIO281c/351c/451c ADJUSTMENT
3 - 37
3
3.6 Image Quality Adjustment (Printing Function)
3.6.1 Automatic gamma adjustment
When the reproduction of gradation is not appropriate, the gradation reproducibility of all colors Y, M, C
and K can be corrected by performing this automatic gamma adjustment. In case the gradation repro-
duction of the image checked is not satisfactory, make this adjustment as described below at parts
replacement.
1) When unpacking or any of the following parts has been unpacked or replaced, be sure to make this
adjustment:
• Laser optical unit • Photoconductive drum • Developer material
• Main charger wire • Main charger grid • Transfer belt
• 1st transfer roller • Drum cleaning blade • Drum cleaner brush
• Image Quality sensor
2) When any of the following parts are replaced or adjusted, make a print and check the image to
determine if adjustment is necessary:
• 2nd transfer roller
Note: Note:
Be sure that this adjustment be made after performing the image adjustment in "3.3 Adjustment
of Image Quality Control" and "3.4 Image Dimensional Adjustment".
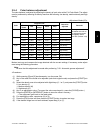
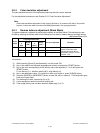
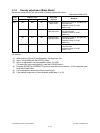
<Adjustment Mode (05)>
Color Code Remarks
1000
1001
1002
1003
Automatic
gamma
adjustment
<Procedure>
1) While pressing [0] and [5] simultaneously, turn the power ON. ? Adjustment
Mode
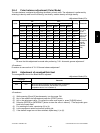
2) Select the A4/LT drawer. Key in the pattern number and press the [FAX] button
to output a “Patch chart for gamma adjustment”.
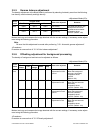
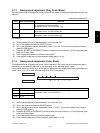
Pattern No. Language/Resolution Remarks
47 PS/600x600dpi When performing code 1000
48* PS/1200x600dpi When performing code 1001
49 PCL/600x600dpi When performing code 1002
50* PCL/1200x600dpi When performing code 1003
* Perform the adjustment only when the expansion memory has been
installed.
3) Place the patch chart for adjustment printed in step (2) face down on the origi-
nal glass, with its side, on which two black squares are present, aligned
against the original scale.
4) Key in a code and press the [START] button. ? The scanner reads the chart
automatically and performs automatic gamma adjustment calculation (approx.
30 sec.).
5) When the adjustment has finished normally, “ENTER” is shown.
Press the [ENTER] button to have the adjustment results reflected.
(To cancel the reflection of adjustment results, press the [CANCEL] button.)
In the case of an abnormal ending, “ADJUSTMENT ERROR” is shown. Press
the [CANCEL] button to clear the error display.
When it is cleared, the control panel display will return to the ready state. Then,
check if the patch chart on the original glass is placed in the wrong direction or
if it is placed inclined on the original glass, and then repeat step (3) and after-
ward.