


e-STUDIO281c/351c/451c TROUBLESHOOTING June 2005 © TOSHIBA TEC
5 - 128
- Print them. (The data cannot be backed up.)
• Registration data for FAX transmission (Delayed transmission / Recovery transmission)
- The data cannot be backed up.
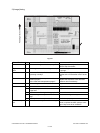
(2) Print out the “FUNCTION LIST FOR MAINTENANCE” (content of Function Mode (13) setting)
list.
• Press the [USER FUNCTIONS] button and then the [USER] button.
• Press the [LIST] button.
• Key in [*] [#] [*] [*] [3] [3] and then press the [START] button. The list is outputted.
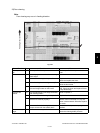
(3) Print out the “FUNCTION” list.
• Press the [USER FUNCTIONS] button.
• Press the [ADMIN] button, enter the password, and then press the [ENTER] button.
• Press the [LIST/REPORT] button and then the [LIST] button.
• Press the [FUNCTION] button. The list is outputted.
(4) Replace the HDD.
(5) Update of HDD program data and UI data.
• Create partitions. (In case of using the download jig, this is not necessary.)
While pressing [3] and [CLEAR] button, turn the power ON. When “Firmware Version Up
Mode” appears on the LCD, key in [3] and press the [START] button.
• Update with the USB storage. See “6. FIRMWARE UPDATING” for details.
• Format the HDD. (Setting Mode (08-690: 2))
* When the FAX unit (GD-1150) is installed. Start up with the FAX Clearing Mode (1*). Per-
form the 1*-100 (FAX Set Up), 1*-102 (Clearing the image data) of the FAX Clearing Mode.
• Perform the gamma automatic adjustment of the printer. See “3.6.1 Automatic gamma adjust-
ment” for details.
(6) Ask users to reset the user’s setting items and to restore the data/information. See the following
for the reset and the restore.
• Printer driver
- Upload them in the “Administrator” menu of TopAccess.
• F-code information, Template registering information, Address book
- Restore them in the “Administrator” menu of TopAccess
• Department management data
- Import them in the “Administrator” menu of TopAccess.
• Image data in the Electronic Filing
- Upload them in the “e-Filing” of TopAccess.
(7) Referring to the “FUNCTION LIST FOR MAINTENANCE” list which was printed beforehand, per-
form the re-setting.
• Print out the “FUNCTION LIST FOR MAINTENANCE” list after the formatting. (Refer to the
procedure of (2).)
• While pressing [1] and [3] simultaneously, turn the power ON. (Function Mode)
• Compare the lists which were printed before and after the formatting to check the setting
items having the different setting values. Set the value which was set before the formatting.
• Turn the power OFF.
(8) Referring to the “FUNCTION” list which was printed beforehand, perform the re-setting of the
default setting of the FAX function.
• Press the [USER FUNCTIONS] button.
• Press the [ADMIN] button, enter the password, and then press the [ENTER] button.
• Press the [FAX] button and then the [TERMINAL ID] button to set each item.
• Press the [INITIAL SETUP] button to set each item.