


1.8 Tasks
87
Move or copy
Use the icon to copy or move a selected task (see chapter 1.8.5).
Print
To print out a task, click on Print. First, the printed page preview appears; then the
standard Print dialog box is displayed.
Delete
Use this button to delete the selected task. Tasks can be deleted also by the Delete key
(in Mac OS X also by Backspace).
Forward
Use this button to forward the selected task to other users.
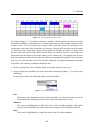
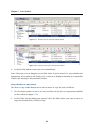
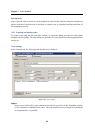
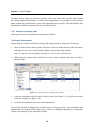
1.8.2 Task list display
In Kerio WebMail, the tasks are shown in a simple list that contains data such as the name of
the task, scheduled deadline and the status of the task (percentage as well as description).
By default, up to 20 tasks are listed on one page. To change number of tasks displayed on
a single page, use the Settings section in Kerio WebMail (see chapter 1.11.1).
Sorting tasks by columns
The detailed information on individual tasks is displayed in the columns. The tasks can be
sorted by the details listed in individual columns. Click the column heading to sort tasks in the
ascending or descending order (see the arrow next to the column name) by alphabet, numbers
or time (depending on the column contents).
Note: For listing by subject, items are sorted by the alphabet of the language set in Settings as
preferred (the General tab) — for details, see chapter 1.11.1. In result, if for example English
is set as preferred and subject are in German, subjects will be ordered by English alphabet and
some specific national characters may also cause problems in sorting.
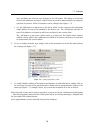
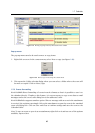
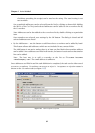
Adding and deleting columns
Users can customize the appearance of the table and the information shown. The columns can
be added or deleted. Right-click the table header and specify the column settings in the Select
fields window. The pop-up menu contains the Change columns option. Checked columns will
be shown in the dialog box, unchecked columns will be hidden.
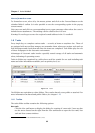
Adjusting the column width
The width of the task list can be adjusted. To change the column width, click between two
columns in the table header and drag the cursor right or left as needed.