


506 Brocade Network Advisor IP User Manual
53-1003056-01
QoS configuration
16
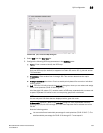
If no DCB maps were created on the switch, the Available DCB Maps list is empty. Otherwise,
the following DCB map details display:
• PG - ID — Lists the priority group ID (15.0 through 15.7 and 0 through 7).
• % Bandwidth — Lists the bandwidth value for priority group IDs 0-7. The total of all priority
groups must equal 100 percent.
• Priority Flow checkbox — Check to enable priority-based flow control on individual priority
groups.
• CoS — Lists the Class of Service (CoS) value that corresponds to the priority group ID rows.
The CoS value must be mapped to at least one of the priority group IDs (0-7).
7. When you have finished the configuration, click OK to launch the Deploy to Ports/LAGs dialog
box.
Creating a Traffic Class map
1. Select Configure > DCB.
The DCB Configuration dialog box displays, showing the status of all DCB-related hardware and
functions.
2. Select a switch, and click Edit.
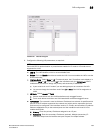
3. Click the QoS tab on the Edit Switch dialog box.
The QoS dialog box displays.
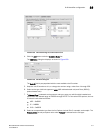
4. Select Traffic Class from the Map Type list.
5. Name the Traffic Class map.
6. Click the Traffic Class cell in a CoS row and directly enter a value from 0-7. You can leave the
cell empty to indicate zero (0).
7. Click the right arrow button to add the map to the Traffic Class Maps list.
If the name of the Traffic Class map already exists, an overwrite warning message displays.
Click Yes to overwrite the existing Traffic Class map.
8. When you have finished the configuration, click OK to launch the Deploy to Products dialog
box.
Editing a Traffic Class map
1. Select Configure > DCB.
The DCB Configuration dialog box displays, showing the status of all DCB-related hardware and
functions.
2. Select a switch, and click Edit.
3. Click the QoS tab on the Edit Switch dialog box.
The QoS dialog box displays.
4. Select a Traffic Class map from the Traffic Class Maps list and click the left arrow button to
load its values in the left pane. The fields are now editable.