


8-41
Cisco ASR 1000 Series Aggregation Services Routers Hardware Installation and Initial Configuration Guide
OL-13208-03
Chapter 8 Replacing Cisco ASR 1000 Series Routers Field-Replaceable Units
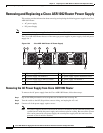
Removing and Replacing a Cisco ASR 1002 Router Power Supply
Caution If you remove a power supply, the system can run for a maximum of five minutes before the system shuts
down. The fans and power elements are independent within the power supply. Therefore, it is not
required that the replacement power supply be energized within five minutes. The only requirement is
that the power supply be installed in the chassis, which energizes the fans and maintains proper system
cooling.
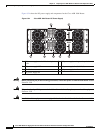
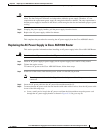
Step 4 Grasping the power supply handles, pull the power supply from the chassis.
Step 5 Replace the AC power supply within five minutes.
This completes the procedure for removing the AC power supply from the Cisco ASR1002 chassis.
Replacing the AC Power Supply in Cisco ASR 1002 Router
This section provides information about installing an AC power supply in the Cisco ASR 1002 Router.
Warning
Never install an AC power module and a DC power module in the same chassis.
Statement 1050
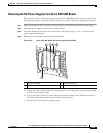
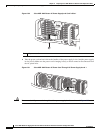
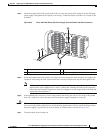
Step 1 Insert an AC power supply in power supply slot 0 or power supply slot 1 until it is fully seated.
Step 2 Tighten the captive screws.
To connect AC power to the Cisco ASR 1002 Router, follow these steps:
Step 1 At the rear of the router, check that the power switch is in the Off (O) position.
Note Turn the power switch to the On (I) position after both power sides of the power cord are
connected.
Step 2 Insert the AC power cable into the AC power inlet and then turn On (I).
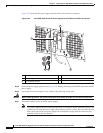
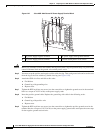
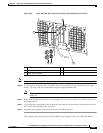
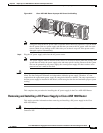
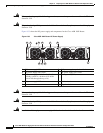
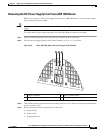
Step 3 To ensure that the AC power cord does not interfere with other cables or wires, dress the AC power cable
in one of the following ways.
a. Leave a small service loop in the AC power cord from the inlet and then secure the power cord
through the AC power supply handle as shown in
Figure 8-30. Or go to step 3b.