


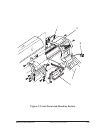


Removal and Installation
8-33
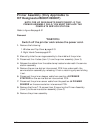
HP DesignJet CP Series Printers
Installation
WARNING
Care should be taken while performing the following
procedure, the encoder strip (item 6) has sharp edges
and could cause injury.
Caution: To prevent damage to the encoder strip, hold it at the
ends only.
Caution: When installing the encoder strip ensure that the
transparent side is underneath.
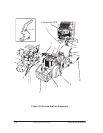
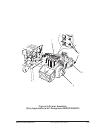
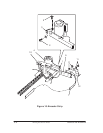
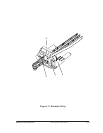
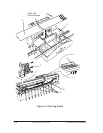
1. Install the two nuts and two washers (items 11) securing the encoder
grounding (item 12) to the encoder spring (item 9).
Note: Working from the rear of the printer.
2. Install the encoder spring (item 9) into the Y-axis motor assembly (item
4) by sliding it onto a retaining pin (item 10).
3. Route the encoder strip (item 7) through the encoder sensor in the
carriage assembly. Install the encoder strip roof.
4. Install the left side of the encoder strip onto the retaining pin (item 6) on
the Y-axis tensioner holder (item 8), then secure with a T-15 screw (item
5).
5. Install two T-15 screws (item 2) through the grounding bridge (item 3).
6. Secure the magnetic core (item 1) to the encoder grounding with a cable
tie.
7. Manually slide the carriage assembly along the printer. Check the
encoder strip does not touch the encoder sensor in the carriage assembly.
8. Install the following:
1. Left Hand Cover ' page 8-18.
2. Right Hand Cover ' page 8-21.
3. Top Cover and Window ' page 8-15.
9. Install the power cable and turn the printer on in service mode.
10.Perform the D03 carriage axis (Y-axis) service test ' page 4-12.