4. To exit from Program Configuration, press ↓ until the message STORE=QUIT
displays. If you want to exit without saving the new value, press Menu/Enter.
If you want to save the new value, press ← or → to select either STORE=SAVE (new
value is stored in NVM) or STORE=CURRENT (new value remains valid until the
printer is powered off (O)). Press Menu/Enter to save the new value.
Horizontal
Note: You can find similar information in “Left Margin” on page 117 and “Right
Margin” on page 117.
This parameter adjusts the distance of the first print position to the left margin from
1 to 60 units (where each unit is 0.706 mm [1/36 in.]). The default is 10 units. The
total range of adjustment is 41.5 mm (1.63 in.).
To change or check the Horizontal adjustment:
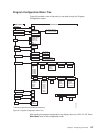
1. Press Menu/Enter. The message PRINT OUT=NO displays.
2. Press ↓ until the message ADJUSTMENTS displays.
3. Press → and the message AFTA=xx or FIXED AFTA=x displays, where xx can be
-5 to +3 or x can be 0 to 8.
4. Press ↓ until the message HORIZ ADJUST=xx displays, where xx can be 1 to 60.If
you want to select a value other than the one displayed, press ← or →.
5. To exit from Program Configuration, press ↓ until the message STORE=QUIT
displays. If you want to exit without saving the new value, press Menu/Enter.
If you want to save the new value, press ← or → to select either STORE=SAVE (new
value is stored in NVM) or STORE=CURRENT (new value remains valid until the
printer is powered off (O)). Press Menu/Enter to save the new value.
Note: If the horizontal adjust value is set and it is too large for the current print line,
a 35 MARGIN ERROR will occur. For more information on the message, see
“Chapter 7. Resolving Printer Problems” on page 139.
Vertical
This parameter adjusts the distance of the first printable line to the top of the forms
from -24 to 24 units (where each unit is 0.176 mm [1/144 in.]). The default value is
0.
Notes:
1. When the Vertical configuration item is adjusted, you must adjust the tear
position in the opposite direction. For example, if you adjust the Vertical
configuration item to -24, you must adjust the tear position to 24. See “Checking
and Adjusting Tear-Off Position” on page 25 or “Tear Position Adjustment” on
page 108, depending on your forms path. Adjust the Vertical configuration
before you adjust the Tear Position.
2. You Park and reload forms to get the new position.
3. You can find similar information in “Top of Form” on page 114.
To change or check the Vertical adjustment:
1. Press Menu/Enter. The message PRINT OUT=NO displays.
2. Press ↓ until the message ADJUSTMENTS displays.
3. Press → and the message AFTA=xx or FIXED AFTA=x displays, where xx can be
-5 to +3 or x can be 0 to 8.
112 4247 Printer Model A00 User’s Guide


