6-4 Scanning With the MultiPASS C3500 Chapter 6
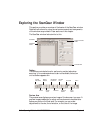
3. In the ScanGear window, specify the scan preview options for your
document as necessary.
4. Click Preview.
5. Review the display of the scanned preview image in the scan
window. Adjust the properties of your image as necessary.
6. Replace your document in the document feeder of the MultiPASS.
7. Click Scan.
An indicator displays showing you the progress of the scan. Once
complete, the image is stored in the Scan folder, where it remains
until you move or delete it.
Scanning From a Windows Application
You can use the MultiPASS to scan documents directly into a Windows
application that supports a TWAIN interface (such as Photoshop). Some
applications allow multiple page scans, while others do not. If you are
unsure whether your Windows aplication supports this feature, refer to
the user documentation for the application you are using.
The following instructions summarize the general procedures for
scanning an image. For specific information on scanning with your
Windows application and specifying MultiPASS as the scan device, refer
to the user documentation for the application you are using.
1. Place the image you want to scan face down in the ADF (automatic
document feeder) of the MultiPASS.
2. In your Windows application, choose the command to scan a
document.
In some applications, the appropriate command may be listed as
Acquire or Acquire Image.
3. In the ScanGear window, specify the preview scan options for your
document as necessary.
4. Click Preview.
5. Review the display of your scanned preview image. Adjust the
properties of the image as necessary.


