Introduction
20
ProSafe Wireless-N 8-Port Gigabit VPN Firewall FVS318N
Log In to the Wireless VPN Firewall
Note: To connect the wireless VPN firewall physically to your network,
connect the cables and restart your network according to the
instructions in the ProSafe Wireless-N 8-Port Gigabit VPN Firewall
FVS318N Installation Guide. A PDF of this guide is on the
NETGEAR support website at
http://support.netgear.com/app/products/model/a_id/19435.
To configure the wireless VPN firewall, you nee
d to use a web browser such as Microsoft
Internet Explorer 7.0 or later, Mozilla Firefox 4.0 or later, or Apple Safari 3.0 or later with
JavaScript, cookies, and SSL enabled. (Google Chrome is not supported at this time.)
Although these web browsers are qualified for use with the wireless VPN firewall’s web
management interface, SSL VPN users should choose a browser that supports JavaScript,
Java, cookies, SSL, and ActiveX to take advantage of the full suite of applications. Note that
Java is required only for the SSL VPN portal, not for the web management interface.
To log in to the wireless VPN firewall:
1. S
tart any of the qualified web browsers.
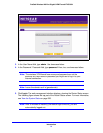
2. In
the address field, enter https://192.168.1.1. The NETGEAR Configuration Manager Login
screen displays in the browser.
Note: The wireless VPN firewall factory default IP address is 192.168.1.1.
If you change the IP address, you need to use the IP address that
you assigned to the wireless VPN firewall to log in to the wireless
VPN firewall.


