


06_PrintProceduresAdvanced.fm Modified: 8/7/02
Template Version 1.0
156 GL-1020 Operator’s Guide (Basic)
AGFA Font Manager, you can add, delete, and manage your font
collection from within that application.
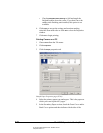
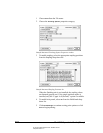
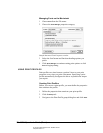
Accessing Font Properties
You access font options by selecting the Quality properties page
in the print properties window. If you are using the PostScript
driver, right-click the printer in the Printers folder and then select
Properties. Click the Quality tab and then click Fonts.
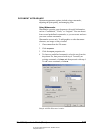
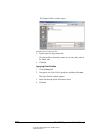
Font Options
Download as font—causes the software to send the complete font
character sets needed to print your document to the printer. Use
this option if your document contains only a few fonts.
Download as bitmap—sends each character in your document as a
binary image. Use this option if your document contains several
fonts.
Use printer true-type fonts—sends no font information to the
printer. Instead, this option relies on the printer’s 136 resident
TrueType fonts. Print time may improve, but the output may not
look as it does on your screen, if the printer doesn’t have the fonts
you used in the document.
Print text black—converts colored text to black, instead of gray.
Enable this option to improve readability.
Send to printer as—specifies how the printer processes font data:
as Adobe (Type 1), Bitmap (Type 3), or TrueType (Type 42).
Use printer fonts for all TrueType fonts—uses printer-resident fonts.
As for Use printer true-type fonts, print time may improve, but
the output may not look as it does on your screen.
Use Substitution Table—causes the printer to replace missing fonts
with the fonts defined in the Substitution Table rather than using
the driver-defined defaults.
AGFA Font Manager
To access the AGFA Font Manager, click Install Fonts (PCL6) or
Run AGFA Font Manager (PSL3). For more information about
using this utility, run it and then choose
AGFA Help Topics from the
Help menu.