


PIM-DM Overview 335
Configuring PIM-DM PIM-DM basic configuration includes:
■ Enabling Multicast
■ Enabling PIM-DM
PIM-DM advanced configuration includes:
■ Entering the PIM View
■ Configuring Sending Interval for the Hello Packets
■ Configuring the Filtering of Multicast Source/Group
■ Configuring the Filtering of PIM Neighbor
■ Configuring the Maximum Number of PIM Neighbor on an Interface
■ Clearing Multicast Route Entries from PIM Routing Table
■ Clearing PIM Neighbors
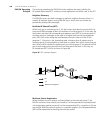
When the router is run in the PIM-DM domain, 3Com recommends that you enable
PIM-DM on all interfaces of the non-border router.
Enabling Multicast
Refer to “Common Multicast Configuration” on page 323.
Enabling PIM-DM
PIM-DM needs to be enabled in the configuration of all interfaces.
After PIM-DM is enabled on an interface, it will send PIM Hello messages periodically
and process protocol packets sent by PIM neighbors.
Perform the following configuration in Interface view.
3Com recommends that you configure PIM-DM on all interfaces in non-special cases.
This configuration is effective only after the multicast routing is enabled in System
View.
Once PIM-DM is enabled on an interface, PIM-SM cannot be enabled on the same
interface and vice versa.
Entering the PIM View
Global parameters of PIM should be configured in PIM View.
Perform the following configuration in System View.
Table 341 Enabling PIM-DM
Operation Command
Enable PIM-DM on an interface pim dm
Disable PIM-DM on an interface undo pim dm
Table 342 Entering PIM view
Operation Command
Enter PIM view pim
Back to system view undo pim