


EPSON Stylus Pro 7600/9600 Revision A
Troubleshooting Troubleshooting Based on Your Printout 148
3.3.2 Uneven Printing/Poor Resolution
If the print quality is abnormal (uneven printing, diffused image, etc.), the following
items should be checked.
1. Adjust the gap
In the SelecType (p.35) or the Self-diagnostic Function (p.220) menu, carry out
gap adjustment (“Gap Adjustment (Bi-D Adjustment, Uni-D Adjustment) (p.60)”
and “Round Trip Print Position Adjustment (Bi-D Adjustment) (p.248)”).
2. If the trouble occurs only when the user is using a specific type of paper (thick
paper), carry out “User Paper Setting” using the panel setting procedure.
(By setting the information concerning the thickness of the paper the user is using
and correcting the print position (correction of changes in the position where ink
hits the paper surface due to differences in paper thickness), avoid influencing the
print position.)
3. If the this problem occurs after replacing the Main Board with a new one:
• Transfer the backup parameters on the old Main Board to the new board.
(p.219)
• Execute “Write D/A Correction Values” in the diagnostic mode.(p.236)
4. If the printer's condition is not improved by the above items (adjustments), check
the following items using the self-diagnostic function.
Head Slant Checking (p.246)
3.3.3 Smudged or Marred Printout (Front)
If smudging or marring occurs due to rubbing by the head, etc. on the paper's printed
surface, check the following items.
1. If smudging is occurring at the front end of the roll paper or at the rear end, widen
the margins at the front end and rear end. (Set the “Roll Paper Margin” front end
and rear end on “15 mm”.)
(If high duty printing was done close to the front end and rear end (margin = 3
mm), the paper will contain a large amount of ink and deformation of the paper
will be accelerated, and depending on the case, the paper will touch the heads.)
2. If paper with weak edges which cannot move smoothly along the paper path is
being used, Select “NORM” for “SUCTION” in the “PAPER CONFIG. MENU”,
which is in the “Panel Settings”.
3. If there is rubbing and smudging due to slow drying in printing of user paper.
Set the stand basket paper Eject direction on Front.
In the item “DRYING TIME” in the User Paper Setting Menu”, in “Panel
Settings,” set the drying time (the time until auto paper cutting is carried out
after printing is finished. (Default: 0 second; Maximum: 10 seconds)
4. If the trouble cannot be resolved by the above methods, check the following.
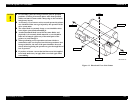
The cap assembly / tension spring is off.
(If this spring comes off, cap will collect inside the cap and ink that adheres
around the head nozzle surface ends up adhering to the paper.
Check to see if dust containing ink, foreign matters or paper is adhering to the
side surface of the head.
C H E C K
P O I N T
Once you have made the “Head Slant Adjustment”, be sure to make
the “Round Trip Print Position Adjustment (Bi-D Adjustment)
(p.248)” and “Gap Adjustment (Bi-D Adjustment, Uni-D
Adjustment)” (p.60).