


EPSON Stylus Pro 7600/9600 Revision A
Adjustment Self-diagnostic Function 249
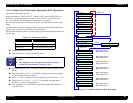
BI-D ADJUSTMENT PROCEDURE
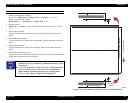
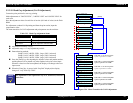
1. Start the Self-diagnostic Function:
Power OFF →
[Paper Feed
∆
]
+
[Paper Feed
∇
]+[Cut/Eject] → Power ON
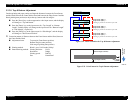
2. Display “Adj: Bi-d”:
[Paper Feed
∇
]
→
[SelecType >]
→
[Paper Feed
∇
] x9
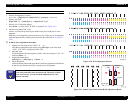
3. Print the 240, V1 black line pattern:
Press
[Enter ↵
]
when “240V1 K PRN” is displayed.
(See Figure 5-47)
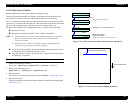
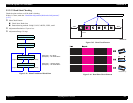
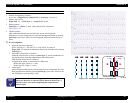
4. Check the test pattern (240, V1 K)
Check to see if the line by the first pass and the line by the second pass are not in
alignment.
When they are in alignment, proceed to the next step. If they are not in alignment,
make the adjustment by referring to the procedure described below. (See Figure
5-49)
K (Black Line) Adjustment Procedure
1. Display the value input screen “240V1 K: xx”:
After the test pattern has been output, press
[SelecType >]
one time when
“240V1 COL PRN” is displayed on the LCD.
2. Input the value:
In consideration of the output pattern, input a value in the range of +99∼–99
and press [Enter ↵
]
.
3. Output the pattern again:
[SelecType >]
→
[SelecType >]
→ [Enter ↵
]
4. Check the pattern:
Check the output pattern and repeat the K (black line) adjustment until the line
by the first pass and the line by the second pass are in alignment.
Figure 5-48. Bi-D Adjustment Patterns
Figure 5-49. Round Trip Print Position (Bi-D) Adjustment (Black)
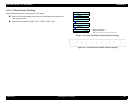
C H E C K
P O I N T
Be sure to make adjustment for K first and then for other colors.
Each color pattern has been set based on K. Therefore, if the K
value is not correct, you can not make adjustments for color
patterns correctly.
Enlarged
1st pass
2nd pass
(+ side)
2nd pass
(– side)