


EPSON Stylus Pro 7600/9600 Revision A
Adjustment Mechanism Adjustment 263
5.3 Mechanism Adjustment
5.3.1 Overview
This section describes the mechanism adjustments you need to perform when
mechanical parts have been replaced or removed. The relationship between parts and
required adjustments are as follows.
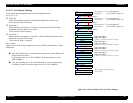
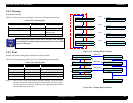
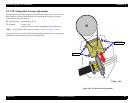
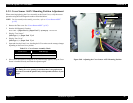
5.3.2 CR Timing Belt Tension Adjustment
This adjustment is necessary for service operations that require you to remove/loosen
the CR Motor or CR Steel Belt. When replacing or re-installing the CR Steel Belt, you
need to confirm the tension of the CR Steel Belt. Tighten or loosen the screws on the
Driven Pulley to increase or decrease the tension.
No special tools are required.
NOTE: For details, refer to “CR Motor ASSY (p.180)”.
Figure 5-64. CR Timing Belt Tension Adjustment
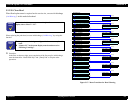
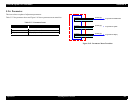
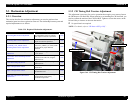
Table 5-29. Required Mechanism Adjustments
Item Description See
CR Timing Belt Tension Adjustment
At reinstallation of the CR Timing
Belt, adjust its tension as specified.
p.263
PF Timing Belt Tension Adjustment
At reinstallation of the PF Timing Belt,
adjust its tension as specified.
p.264
P_THICK_0.3/P_THICK Sensor
Mounting Plate Position Adjustment
At reinstallation of the P_THICK
sensor or P_THICK_0.3 sensor, make
adjustment for paper thickness
detection.
p.265
Cover Sensor ASSY Mounting Position
Adjustment
Adjust the mounting position of the
Cover Sensor.
p.267
CR Encoder Sensor Mounting Position
Adjustment
Adjust the CR Encoder mounting
position on the CR Unit, using the
dedicated tool.
p.268
Cutter Positioning Adjustment
Adjust the cutter position, using the
dedicated tool.
p.269
Paper Cutting Position Check
Check the result of the adjustment
made above.
p.271
Paper Cutting Position Check
Adjust the PF Encoder position, using
the dedicated tool.
p.272
Head Slant Adjustment (Mechanical
Adjustment)
Adjust the Print Head slant using the
self-diagnostic mode and by
mechanical adjustment.
p.247
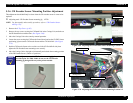
CR Tension Screw
CR Timing Belt
CR Tension Bracket