


EPSON Stylus Pro 7600/9600 Revision A
Disassembly & Assembly Disassembly and Assembly of Cleaning Mechanism 200
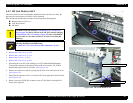
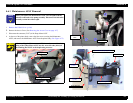
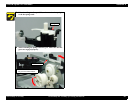
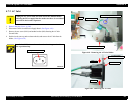
4.6.2 Pump Motor ASSY
1. Remove the Maintenance ASSY.
(See p.199)
2. Remove the two (M3
×
8) screws securing the Pump Motor ASSY to the Maintenance
ASSY and remove the Pump Motor ASSY.
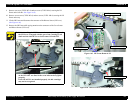
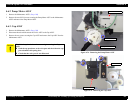
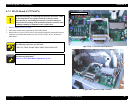
4.6.3 Cap ASSY
1. Remove the Maintenance ASSY.
(See p.199)
2. Disconnect the tube which connect the
Valve ASSY
to the Cap ASSY.
3. Remove the two screws securing the Cap ASSY and remove the Cap ASSY from the
Maintenance ASSY.
Figure 4-74. Removing the Pump Motor ASSY
Figure 4-75. Removing the Cap ASSY
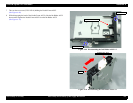
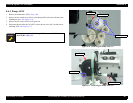
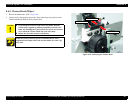
C A U T I O N
Check for the points below when removing/mounting the Cap
ASSY.
Push the cap part down to the valve part and check that the cap
part rebounds with spring force.
Check that the valve part is not dislocated.
Pump Motor ASSY
Screws (M3×8) ×2
Maintenance ASSY
Valve ASSY
Cap ASSY