


EPSON Stylus Pro 7600/9600 Revision A
Disassembly & Assembly Disassembly and Assembly of Carriage (CR) Mechanism 184
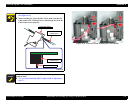
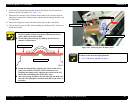
4.3.10 CR Encoder Scale (Timing Fence)
1.
Remove the R Side Cover. (p.160)
2.
Remove the L Side Cover. (p.163)
3.
Remove the I/H Cover. (p.164)
4.
Remove the H Top Cover. (p.165)
5.
Remove the CR Encoder Sensor ASSY. (p.178)
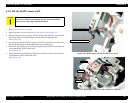
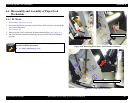
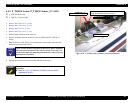
6. Disengage the CR Encoder Scale (Timing Fence) from the CR Encoder Scale
Fastening Spring on the L Side Frame side.
7. Remove the CR Encoder Scale from the CR Encoder Scale Holders.
NOTE: The number of CR Encoder Scale Holders is as follows:
Stylus Pro 7600: 2 guides
Stylus Pro 9600: 3 guides
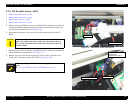
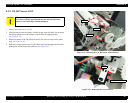
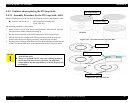
8. While pushing the cutter area gently, shift the carriage to the left about 2 cm to unlock
the carriage and then move the carriage to the left from the capping position.
(See Figure 4-24)
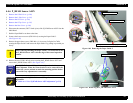
9. Disengage the CR Encoder Scale from the hook on the CR Encoder Scale Holder R
and draw out the CR Encoder Scale from the carriage area.
Figure 4-48. Releasing from the CR Encoder Scale Fastening Spring
Figure 4-49. CR Encoder Scale Removal
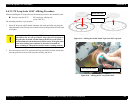
C A U T I O N
When unlocking the carriage, do not move the carriage by
about 2 cm or more with the cutter pushed into the innermost
position; otherwise, the cutter edge would be damaged.
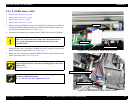
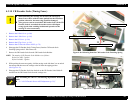
Take great care not to scratch the CR Encoder Scale. (If the CR
Encoder Scale is scratched, the encoder sensor will output
wrong signals, thus resulting in abnormal operation of the
carriage or error occurrence.)
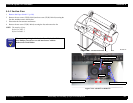
A D J U S T M E N T
R E Q U I R E D
After assembling the CR ENC, the following adjustments should be
made.
“5.1.4.8 CR Encoder Sensor ASSY Adjustment (p.215)”
CR Encoder Scale Fastening Spring
CR Encoder Scale
CR Encoder Scale Holder
CR Encoder Scale Holder R
CR Encoder Scale