


EPSON Stylus Pro 7600/9600 Revision A
Adjustment Self-diagnostic Function 256
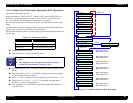
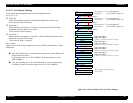
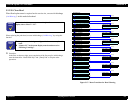
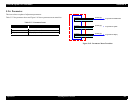
5.2.3.20 Clean Head
When Head replacement is required on the service site, execute ink discharge
(
“Ink Blowing”) in this mode beforehand.
When replacing the print head, execute ink discharge (“Ink Blowing”) by using this
function.
Procedure:
In the flow as shown at right, upon completion of the first step for ink discharge,
enter the branch for “Head Wash Skip” and “[Enter] End” to skip the other
operations.
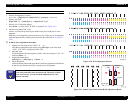
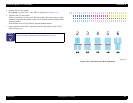
Figure 5-57. Menu Transition for Head Cleaning
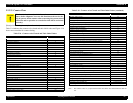
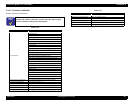
C H E C K
P O I N T
If transition in the sequence can not take place for some reason, the
display shows “Reset ** I/C”.
C H E C K
P O I N T
Prepare seven draining cartridges, which are necessary for this
work.
“Opener I/C” in the menu display must be understood as
“Draining Cartridge”.
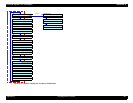
Install draining cartridges.[Enter]
Set Opener I/C
[Enter]
[Pause]
Completion of ink discharge
Ink Blowing
Set Cleaning I/C
Ink Dischg. Skip
Install cleaning cartridges.[Enter]
[Enter]
[Pause]
Completion of cleaning liquid filling
Head Cleaning
Set Opener I/C (2)
Head Wash Skip
Install draining cartridges.[Enter]
[Enter]
[Pause]
Completion of cleaning liquid filling
Dischrg. washfluid
(2)
Set Cleaning I/C
(2)
Ink Dischg. Skip (2)
Install cleaning cartridges.[Enter]
[Enter]
[Pause]
Completion of cleaning liquid filling
Head Cleaning (2)
Set Opener I/C (3)
Head Wash Skip (2)
Install draining cartridges.[Enter]
[Enter]
[Pause]
Completion of cleaning liquid filling
Dischrg. washfluid
(3)
Set Cleaning I/C
(3)
Ink Dischg. Skip (3)
Install cleaning cartridges.[Enter]
[Enter]
[Pause]
Completion of cleaning liquid filling
Head Cleaning (3)
Set Opener I/C (4)
Head Wash Skip (3)
Install draining cartridges.[Enter]
[Enter]
[Pause]
Completion of cleaning liquid filling
Dischrg. washfluid
(4)
Please Remove I/C
(5)
Ink Dischg. Skip (4)
Remove cartridges and press [Enter]
[Enter]
[Pause]
Completion of cleaning liquid filling
Execute Suction
(5)
Adj : Counter Clear
[Enter] End