


EPSON Stylus Pro 7600/9600 Revision A
Adjustment Self-diagnostic Function 254
PROCEDURE FOR HEAD GAP ADJUSTMENT (UNI-D ADJUSTMENT)
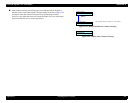
1. Start the Self-diagnostic Function:
Power OFF →
[Paper Feed
∆
]
+
[Paper Feed
∇
]+[Cut/Eject] → Power ON
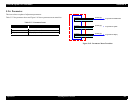
2. Display “Adj: Uni-D”:
[Paper Feed
∇
]
→
[SelecType >]
→
[Paper Feed
∇
] x11
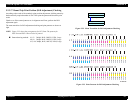
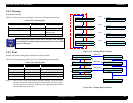
3. Print the pattern.
[SelecType >]
→
[Enter
↵
]
when “[Enter] Adjust Print” is displayed
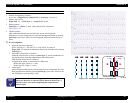
(See Figure 5-55)
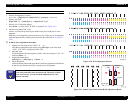
4. Check the pattern:
Make certain that the black lines and color lines are not out of alignment.
When they are not out of alignment, leave the head gap adjustment mode by pressing
[SelecType >]
two times. If they are out of alignment, follow the instructions given
below:
If out of alignment
1. Select the gap item in question:
Select “Gap 240,V1”, “Gap 240,V2” or “Gap 190,V4” by means of
[Paper Feed
∇
]
and enter the adjustment menu for the selected item by pressing
[SelecType >]
.
2. Adjust the color position in question:
Select the relevant color by means of [SelecType >], and in consideration of
the printed pattern, input the compensation value on the panel.
Shift direction (black line as reference):
(Compensation setting: in increments of 1/2880 inch)
Shift to the right = Input a (+) value
Shift to the left = Input a (-) value
3. Check again:
Check the pattern output again, and when the lines are in alignment, leave the
head gap adjustment mode by pressing
[SelecType >]
two times.
If the lines are
out of alignment, repeat inputting a value.
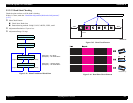
Figure 5-55. Print Pattern (Head Gap Adjustment)
C H E C K
P O I N T
Even when you have left the head gap adjustment menu, you can
display the menu for an relevant item by means of [SelecType >].
Therefore, there is no need of outputting the comprehensive
patterns again.
Enlarged View
Black line
Color line
(+ side§)
Color line
(– side)