


EPSON Stylus Pro 7600/9600 Revision A
Disassembly & Assembly Disassembly and Assembly of Carriage (CR) Mechanism 177
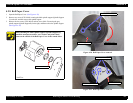
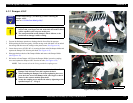
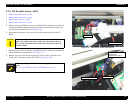
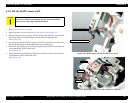
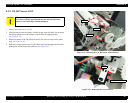
4.3.4.2 Cutter Solenoid
1.
Remove the Cutter Holder ASSY. (p.175)
2. Release the engagement between the Cutter Cap and the CR Lock Kicker, then remove
the Cutter Cap + Cutter Solenoid Iron Core and Cutter Solenoid Spring.
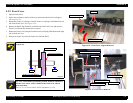
3. Take out the two screws (CP(W): M3
×
6) holding the Cutter Solenoid, then remove the
Cutter Solenoid by pushing it out from the bottom of the Cutter Holder ASSY with the
shaft of a (+) screwdriver or the like.
Figure 4-36. Cutter Solenoid Removal
C A U T I O N
Do not pull the cable to remove the Cutter Solenoid.
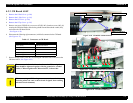
A D J U S T M E N T
R E Q U I R E D
After installing the Cutter Solenoid, the following adjustment
should be done.
“5.1.4.11 Cutter Solenoid ASSY or Paper Guide L Adjustment
(p.217)”
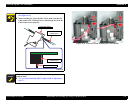
Cutter Cap
CR Lock Kicker
Screws (CP(W): M2.5×5) ×2
Push
Cutter Solenoid