


EPSON Stylus Pro 7600/9600 Revision A
Adjustment Overview 219
5.1.6 Firmware Reinstallation
In Stylus Pro 7600/9600, the firmware is written in the Flash ROM on the Main Board.
When the Main Board has been replaced with a new one, write the firmware in the
Flash ROM on the new Main Board by the procedure described below.
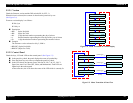
5.1.6.1 Firmware Installation through ROM-DIMM
Install the firmware through a ROM-DIMM by the following procedure:
1. Check the firmware version.
([SelecType] key
→
“PRINTER STATUS MENU”
→
“VIRSION”)
2. Write the firmware file in the RCC format in a ROM-DIMM (C309 PROG).
3. Turn off the power switch and disconnect the power cable from the printer body.
4. Remove the cover at the rear of the printer body and insert the ROM-DIMM prepared
at step 1 into the dedicated socket.
5. Turn on the power to the printer body.
6. The firmware will be installed automatically and installation will be completed.
7. Turn off the power switch and disconnect the power cable from the printer body.
8. Pull the ROM-DIMM out of the dedicated socket.
9. Turn on the power to the printer body and check the firmware version.
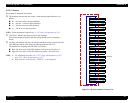
5.1.6.2 Firmware Installation through Interface
This section describes the procedure for firmware installation through the parallel
interface, as an example.
1. Connect the host PC to the printer with the parallel cable.
2. Turn on the power to the printer body.
3. Check the firmware version.
([SelecType] key
→
“PRINTER STATUS MENU”
→
“VIRSION”)
4. Make certain that the panel display of the printer body shows “READY”.
5. Transmit the firmware file in the IPL format from the host PC to the printer.
6. Firmware installation is completed.
7. Turn off the power to the printer once and then turn it on again.
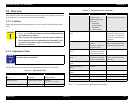
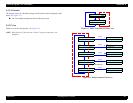
C A U T I O N
Immediately after reloading firmware to the new MAIN board
without any parameters existing on it, when the printer's power
is turned on, the ink initial refilling operation starts. If initial
refilling is not necessary, be sure to start the printer by the
following procedure.
1. Start the Self-diagnostic function when the power is turned On.
2. Select “Parameter: Update” under “Check: Parameter”.
3. Select “Update:I nkParameter”.
4. Select “Reset” in “Init. Fill”.
5. Turn the printer’s power switch Off, then turn it On again.
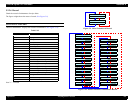
The correct firmware data file should be used to match the
download method.
C H E C K
P O I N T
Set the parallel interface in the compatibility mode.