


EPSON Stylus Pro 7600/9600 Revision A
Adjustment Overview 215
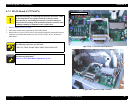
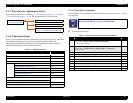
5.1.4.5 P_EDGE Sensor ASSY Adjustment
Described below are the adjustment items to be made once the P_EGDE Sensor ASSY
(p.179) has been replaced.
Adjusting tools:
A3Tracing Paper #F751(Microtrace #300 LMB)
A3 copying paper (PPC)
Scale 1000mm #F713
Scale Stopper #F714
Adjustment items (steps):
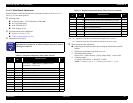
5.1.4.6 P_REAR Sensor ASSY Adjustment
Described below are the adjustment items to be made once the P_REAR Sensor ASSY
(p.191) has been replaced.
Adjusting tools:
A3Tracing Paper #F751(Microtrace #300 LMB)
Adjustment items (steps):
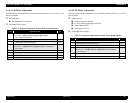
5.1.4.7 P_THICK/P_THICK_0.3 Sensor ASSY Adjustment
Described below are the adjustment items to be made once the P_THICK Sensor/
P_THICK Sensor_0.3 ASSY (p.190) has been replaced.
Adjusting tools:
Thickness gauge (0.3/ 0.4, 0.8/ 0.9mm)
Adjustment items (steps):
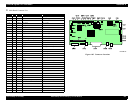
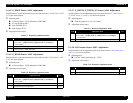
5.1.4.8 CR Encoder Sensor ASSY Adjustment
Described below are the adjustment items to be made once the CR Encoder Sensor
ASSY (p.178) has been replaced.
Adjusting tools:
CR ENC sensor positioning jig #F799
Adjustment items (steps):
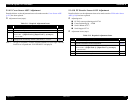
Table 5-7. Required Adjustment Items
Step Adjustment Item See
<Start the Self-diagnostic Function>
(Power OFF →
[Paper Feed
∆
]
+
[Paper Feed
∇
]+[Cut/Eject]
→ Power ON)
p.220
1 P_Edge Sensor AD Adjustment p.232
2 Feed Correction + T&B Adjustment p.239
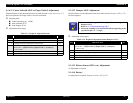
Table 5-8. Required Adjustment Items
Step Adjustment Item See
<Start the Self-diagnostic Function>
(Power OFF →
[Paper Feed
∆
]
+
[Paper Feed
∇
]+[Cut/Eject]
→ Power ON)
p.220
1 P_Rear Sensor AD Adjustment p.231
2 Rear Sensor Position Adjustment p.243
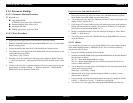
Table 5-9. Required Adjustment Items
Step Adjustment Item See
<Start the Self-diagnostic Function>
(Power OFF →
[Paper Feed
∆
]
+
[Paper Feed
∇
]+[Cut/Eject]
→ Power ON)
p.220
1 Testing will be executed by “Sensor” (Test menu) → “Paper” p.224
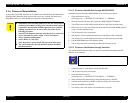
Table 5-10. Required Adjustment Items
Step Adjustment Item See
<Mechanism Adjustment>
1 CR Encoder Sensor Mounting Position Adjustment p.268