


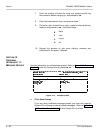

3 - 28 Fill in the Screens
Issue 1 EliteMail VMS/EliteMail Limited
11. To continue adding the remaining Extension # IDs in the range,
press .
12. To stop the process altogether, press . Repeat these steps to
add different ranges of Extension # IDs without conflicting IDs.
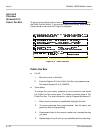
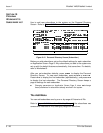
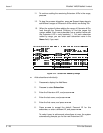
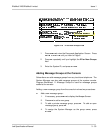
13. When the system finishes adding the range of Extension # IDs,
look through the Personal Directory to find the pages the
system added. Each new subscriber has a spelled name with
the Extension # ID in curly brackets { }. For each subscriber
added by range, you can enter each subscriber name in the
Name field, if you want.
Figure 3-13 Subscriber Added by Range
Add subscribers individually:
1. Press to display the Add Menu.
2. Press to select Subscriber.
3. Enter the Extension # ID, and press .
4. Enter the last name, and press .
5. Enter the first name, and press .
6. Press to accept the default Personal ID for this
subscriber, or enter a different ID, and press .
To make it easy to add several subscribers at once, the system
automatically prompts you for the next Extension # ID.