


3 - 34 Fill in the Screens
Issue 1 EliteMail VMS/EliteMail Limited
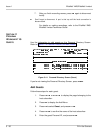
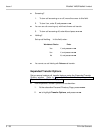
5. To assign another subscriber as the group owner, press .
Enter the first few letters of the owner last name, and press
.
The system shows the first matching name.
6. Press to select the name, or to view the next matching
name.
7. Press until you refer to the name you want. Then, press .
8. After you select the message group owner, enter the group
name or number, and press .
For numbered groups, the first three characters of the group
name should be digits (
e.g.
, 234 Sales Group). For lettered
groups, subscribers use the first three letters of the group name
to leave messages for the group.
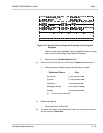
9. Record a name for the group. Establish a local connection and
record the name. For details, refer to Section 3 Program
Worksheet 2: The Opening Greeting on page 3-6.
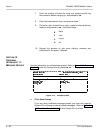
Add members to the message group:
1. Press .
2. Press to select Member.
3. Enter the first few letters of the first group member last name.
The system displays the first matching name.
4. Press to add the subscriber to the group, or press to
display the next matching name. Press or until you have
added all the members to the message group.
S
ECTION
13
P
ROGRAM
W
ORKSHEET
12:
S
PECIAL
S
UBSCRIBER
S
ETTINGS
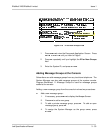
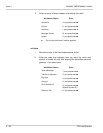
Use this information to set up custom features for individual subscribers on
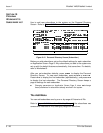
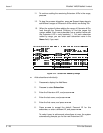
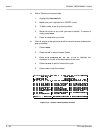
the Personal Directory. Refer to Figure 3-17 Personal Directory Screen
(Subscriber).
The subscribers added to the system with Worksheet 9 receive the default
settings on Application Screen Page 5. However, there may be some
subscribers who want features other than the default. Using this sheet
as
your guide, configure custom features by changing the settings on
individual Personal Directory pages for those subscribers.
This section assumes you have added the subscribers to the system. To
add a new subscriber, follow the procedure in Figure 3-17 Personal