


Chapter 3 Storage Arrays 3-41
5. Determine the status of all modules and their components in the storage array.
Note the status of the indicator lights on the front and the back of each module. A
green light indicates a normal status; an amber light indicates a hardware fault.
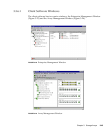
d. Select the appropriate component button for each module in the Physical View
of the Array Management Window to view the status of all its components.
The status for each component will be either Optimal or Needs Attention.
6. Does each module display green lights only, and is the status Optimal on each
module component?
■ Yes- Go to step 8.
■ No - Go to step 7.
7. Diagnose and correct the fault.
a. Complete the recovery procedure.
If the Recovery Guru directs you to replace a failed component, use the individual
lights on the modules to locate the specific failed component. For troubleshooting
procedures, refer to “Troubleshooting and Recovery” on page 3-22.
b. To ensure that the problem has been corrected, select Recheck in the Recovery
Guru to re-run the Recovery Guru.
c. If the problem persists, contact technical support.
8. Perform a complete backup of the drives you are replacing.
9. Use the storage management software to manually fail the first drive that you are
replacing, and then verify the following conditions:
■ Software shows a Failed status for only one drive (the one that you manually
failed)
■ Fault light above the failed drive is illuminated
Caution – Potential data loss. Removing a drive that has not failed can cause data
loss. To prevent data loss, remove only drives that have a fault light on or a Failed
status in the storage management software.
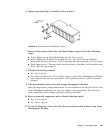
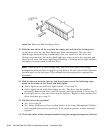
10. Lift the locking lever on the failed drive and remove it from the slot.