


Configuring Communication
105
VG-Series Modero Touch Panels
10. Verify the fields in the IP Settings section have been properly configured. Refer to the Step 1:
Configuring the Panel’s Wireless IP Settings section on page 102 for detailed information.
11. Press the Back button to navigate to the Protected Setup page and press the on-screen Reboot
button to both save any changes and restart the panel. Remember that you will need to navigate to
the System Settings page and configure the connection to a target Master.
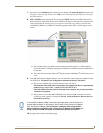
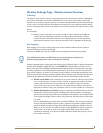
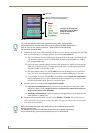
12. After the panel restarts, return to the Wireless Settings page to verify the Link Quality and Signal
Strength:
The bargraphs have been replaced with descriptions: None, Poor, Fair, Good, Very Good,
and Excellent (FIG. 80).
Refer to the NXA-WAP200G Instruction Manual for more detailed setup and configuration procedures.
Configuring the Modero’s wireless card for secured access to a WAP200G
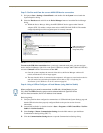
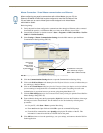
After logging into the WAP200G, the default Status page appears within the web browser. These
read-only values are "pulled" from some of the other user-configurable Configuration Utility pages. By
default, wireless Modero panels are configured for unsecured communication to a Wireless Access
Point. To properly setup both the WAP200G and panel for secure communication, you must first prepare
the Modero panel and then use the information provided to fill out the fields within the WAP’s
browser-based Basic Wireless Configuration page.
Since the code key generator on Modero panels use the same key generation formula, all panels will
generate identical keys for the same Passphrase. The generators used on WAPs will not produce the same
key as the Modero generator even if you use the same Passphrase. This is why we recommend creating
the Current Key FIRST on the Modero and then entering that information into the appropriate
WAP200G fields.
1. Power-down the Modero unit and follow the wireless card installation procedures (on NXD panels)
outlined in the Step 2: Install the 802.11g mini-PCI Wireless Card section on page 38.
When configuring touch panels for wireless communication, verify that no Ethernet
connector is installed within the panel before the unit is power cycled.
2. Power-up the panel (this allows it to detect the card).
3. Press the Protected Setup button (located on the lower-left of the panel page) to open the Protected
Setup page and display an on-screen keypad.
4. Enter 1988 into the Keypad’s password field and press Done when finished.
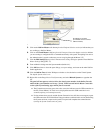
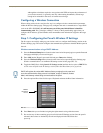
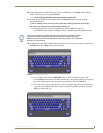
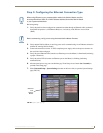
5. Press the Wireless Settings button (located on the lower-left) to open the Wireless Settings page.
6. Locate the Wireless Settings section of the Wireless Settings page (FIG. 81).
The remaining Wireless Settings fields are then greyed-out and become read-only.
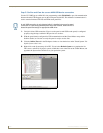
All NXA-WAP200Gs are factory-shipped as an unsecured WAP with no WEP
encryption. The WAP200G initial Status page will display the status of both the WEP
and WPA (both disabled).
The signal strength field should provide some descriptive text regarding the strength
of the connection to a Wireless Access Point. If there is no signal or no IP Address
displayed; configuration of your network could be required.