Installation Procedures: 17" Panels
83
VG-Series Modero Touch Panels
Installing the NXD-1700VG into a Flat Surface using #6 screws
Mounting screws (#6, not included) are secured through two sets of circular holes located at the left and
right sides of the NXD-1700VG. The most important thing to remember when mounting the NXD
Wall Mount is that the outer frame (Mounting Tabs) must be installed flush against the mounting
surface.
Most beams have a distance of about 14" to 16". This is too narrow to accommodate the 17.03" (43.26
cm) wide outer housing (back box) of the NXD-1700VG.
1. Determine which stud beam configuration to use:
Pre-wall framing is done prior to the drywall installation (local framing instructions vary
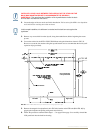
based on location and building codes). Mount the main NXD unit into a pre-wall environment
by fitting the right side of the box against a beam, then notching the stud closest to the
connectors (based on FIG. 61 and the depth of the drywall), and using the securing screws to
fasten the unit into place after the drywall has been installed. A horizontal beam can be
installed (framed) below the back box to provide lower support.
With an existing wall in place, continue with steps 3 and 4 to notch one or both selected
beams. There is no horizontal support beam "framing" in this method.
Take into account the width of the cutting blade and the thickness of the drywall surface
when making the cut into the drywall.
2. Locate the edges of the two studs used in this installation. The location of the NXD is site dependant
and could involve notching more than one beam.
3. Remove any screws/nails from the surface, along the notched beam, before beginning the cutout
process.
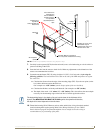
4. Follow the procedures outlined within Steps 1 - 5 on page 42 thru page 43 to carefully reinstall the
LCD panel back into the back box housing.
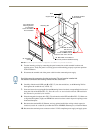
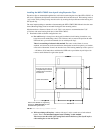
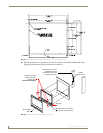
5. Cut out the surface for the Wall Mount using the dimensions shown in FIG. 61.
INSTALLER: LEAVE A GAP BETWEEN THE SURFACE OF THE STUD AND THE
BACK BOX MOUNTING RIDGE TO ACCOMMODATE THE DRYWALL/
SHEETROCK. This gap allows the installation of the drywall/sheetrock after the back
box has been mounted onto the beams.
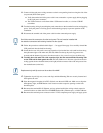
In this sample installation, the left beam is notched and the back box rests against the
right beam.


