


9-13
Cisco Intrusion Prevention System Appliance and Module Installation Guide for IPS 7.1
OL-24002-01
Chapter 9 Installing and Removing the ASA 5585-X IPS SSP
Removing and Replacing the ASA 5585-X IPS SSP
To verify the status of the ASA 5585-X IPS SSP, follow these steps:
Step 1
Log in to the adaptive security appliance.
Step 2
Verify the status of the ASA 5585-X IPS SSP:
asa# show module 1
Mod Card Type Model Serial No.
--- -------------------------------------------- ------------------ -----------
1 ASA 5585-X IPS Security Services Processor-2 ASA5585-SSP-IPS20 ABC1234D56E
Mod MAC Address Range Hw Version Fw Version Sw Version
--- --------------------------------- ------------ ------------ ---------------
1 0001.0001.0001 to 0001.0001.000c 1.0 2.0(7)0 7.1(3)E4
Mod SSM Application Name Status SSM Application Version
--- ------------------------------ ---------------- --------------------------
1 IPS Up 7.1(3)E4
Mod Status Data Plane Status Compatibility
--- ------------------ --------------------- -------------
1 Up Up
If the status reads
Up
, the ASA 5585-X IPS SSP has been properly installed.
Removing and Replacing the ASA 5585-X IPS SSP
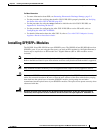
To remove and replace the ASA 5585-X IPS SSP in the ASA 5585-X, follow these steps:
Step 1
Shut down the ASA 5585-X IPS SSP.
asa# hw-module module 1 shutdown
Shutdown module in slot 1? [confirm]
Step 2
Press Enter to confirm.
Step 3
Verify that the ASA 5585-X IPS SSP is shut down by checking the indicators.
Step 4
Power off the ASA 5585-X.
Step 5
Remove the power cable from the ASA 5585-X.
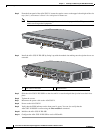
Step 6
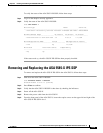
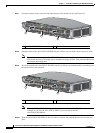
From the front panel of the ASA 5585-X, loosen the captive screws on the upper left and right of the
ASA 5585-X IPS SSP in slot 1.