Epson Research and Development Page 17
Vancouver Design Center
S5U13705B00C Rev. 1.0 ISA Bus Evaluation Board User Manual S1D13705
Issue Date: 01/02/13 X27A-G-005-03
6.6 LCD Panel Voltage Setting
The S5U13705B00C board supports both 3.3V and 5V LCD panels through the LCD
connector J5. The voltage level is selected by setting jumper J4 to the appropriate position.
Refer to Table 2-3: “Jumper Settings,” on page 9 for setting this jumper.
Although not necessary for signal buffering, buffers have been implemented in the board
design to provide flexibility in handling 3 and 5 volt panels.
6.7 Monochrome LCD Panel Support
The S1D13705 directly supports 4 and 8-bit, dual and single, monochrome passive LCD
panels. All necessary signals are provided on the 40-pin ribbon cable header J5. The
interface signals on the cable are alternated with grounds to reduce crosstalk and noise.
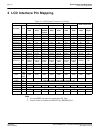
Refer to Table 3-1: “LCD Signal Connector (J5) Pinout,” on page 10 for specific
connection information.
6.8 Color Passive LCD Panel Support
The S1D13705 directly supports 4 and 8-bit, dual and single, color passive LCD panels. All
the necessary signals are provided on the 40-pin ribbon cable header J5. The interface
signals on the cable are alternated with grounds to reduce crosstalk and noise.
Refer to Table 3-1: “LCD Signal Connector (J5) Pinout,” on page 10 for specific
connection information.
6.9 Color TFT/D-TFD LCD Panel Support
The S1D13705 directly supports 9 and 12-bit active matrix color TFT/D-TFD panels. All
the necessary signals can also be found on the 40-pin LCD connector J5. The interface
signals on the cable are alternated with grounds to reduce crosstalk and noise.
Refer to Table 3-1: “LCD Signal Connector (J5) Pinout,” on page 10 for connection infor-
mation.
6.10 Power Save Modes
The S1D13705 supports hardware and software power save modes. These modes are
controlled by the utility 13705PWR. The hardware power save mode needs to be enabled
by 13705PWR and then activated by DIP switch S1-6. See Table 2-1: “Configuration DIP
Switch Settings,” on page 8 for details on setting this switch.


