Note
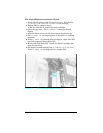
The 50 SERVICE error message can be cleared
immediately by shorting the C202 leads on the
HP LaserJet 4/4M (or the C205 leads on the HP
LaserJet 4 Plus/4M Plus/5/5M/5N) on the DC
Controller. Remove the Formatter PCA to access
the DC Controller as shown in Chapter 6.
Checks Action
Is the Fuser Assembly correctly
seated?
Reseat the Fuser Assembly. Allow
adequate time for the error message to
clear (10 minutes) and turn the printer
ON.
Is the Fuser Bulb/ Thermoswitch open?
1.
2.
The fuser bulb and thermoswitch are
wired in series. To check if one or the
other is defective, perform the following:
Remove the Fuser Assembly from the
printer.
Use an ohmmeter and measure the
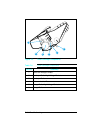
continuity between pins (see Figure
7-6, callout 1). It should read about 2
ohms (about 4 ohms for the 220 volt
fuser). If an open condition is detected,
either the fusing bulb or the
thermoswitch is defective. Replace the
defective component (refer to Chapter
6) or replace the complete Fuser
Assembly.
Is the Thermistor defective? 1.
2.
Remove the Fuser Assembly and let it
cool to room temperature.
Use an ohmmeter and measure the
resistance between pins (see Figure
7-6, callout 2) It should read about 220
K ohms +/- 40 K ohms at ambient
room temperature. If the thermistor is
either open or shorted, replace the
thermistor (refer to Chapter 6) or the
complete Fuser Assembly.
Does the error persist? 1.
2.
Verify all cabling is correct.
Replace the following components in
the order given:
Power Supply Assembly
DC Controller PCA
See Figure 7-11 for Fuser Assembly location and Chapter 6 for
removal and replacement, as necessary.
Table 7-10
50 SERVICE Fuser Malfunction Checks
7-30 Troubleshooting


