Removal and Replacement
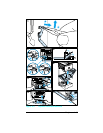
This section describes the complete disassembly of the Duplexer.
Tasks that must be performed before beginning the procedure are
listed first. Remove the assemblies in the order listed to prevent
damage.
The assembly procedure is the reverse of the removal procedure,
except where specific instructions are provided.
In the removal and replacement procedures that follow, the
number inside the parentheses, such as (4), refers to the number
of screws to remove.
Warning
Power OFF the printer and disconnect the power
cord from the outlet and the printer before
servicing the Duplexer.
Some sheet metal edges are sharp. Be careful
when working in these areas to avoid being cut.
Caution
The Duplexer contains parts that are sensitive to
Electro-Static Discharge (ESD). Always observe
proper ESD procedures when servicing the
Duplexer.
This symbol appears when the parts being
serviced are especially susceptible to ESD
damage.
Required Tools
#2 Magnetized Phillips Screwdriver
Small Flat-head Screwdriver (6-inch shaft)
Needle-nose Pliers
Caution
Do not use a Pozidriv screwdriver. Damage to the
screw heads will result.
A -8 Duplexer


