


Copying
197
1
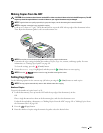
Load the document(s) face up into the ADF with the top edge of the document(s) in first.
OR
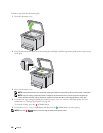
Place a single document face down on the document glass, and close the document cover.
For details about loading a document, see "Making Copies From the ADF" on page 191 or "Making Copies From
the Document Glass" on page 189.
2
Press the
(Copy)
button.
3
Press the button until
Preferences
is highlighted, and then press the
(Set)
button.
4
Press the button until
Multiple-Up
is highlighted, and then press the
(Set)
button.
5
Press the button to select the desired setting, and then press the
(Set)
button.
NOTE:
Values marked by an asterisk (
*
) are the factory default menu settings.
6
Customize the copy settings including the number of copies, copy size, contrast, and image quality. For more
information, see "Setting Copy Options" on page 191.
7
Ensure that
Start Copy
is highlighted, and then press the
(Start)
button to start copying.
When you are using the document glass and
Multiple-Up
is set to
Auto
, or
Manual
, the display prompts you
for another page. Press the button to select
Yes
or
No
, and then press the
(Set)
button.
If you select
Yes
, press the button to select
Continue
or
Cancel
, and then press the
(Set)
button.
Margin Top/Bottom
To specify the top and bottom margins of the copy:
1
Load the document(s) face up into the ADF with the top edge of the document(s) in first.
OR
Place a single document face down on the document glass, and close the document cover.
For details about loading a document, see "Making Copies From the ADF" on page 191 or "Making Copies From
the Document Glass" on page 189.
2
Press the
(Copy)
button.
3
Press the button until
Preferences
is highlighted, and then press the
(Set)
button.
4
Press the button until
Margin Top/Bottom
is highlighted, and then press the
(Set)
button.
5
Press the or button or enter the desired value using the numeric keypad, and then press the
(Set)
button.
NOTE:
Values marked by an asterisk (
*
) are the factory default menu settings.
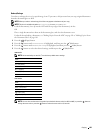
Off* Does not perform multiple-up printing.
Auto Automatically reduces the size of original images to fit onto one sheet of paper.
Manual Prints the original size of original images onto the one sheet of paper in the size specified in
Reduce/Enlarge
.
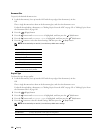
4 mm*/0.2 inch* Specify the value in increments of 1 mm/0.1 inch.
Available Range:
0-50 mm/0.0-2.0 inch