


240
Faxing
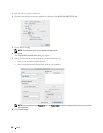
To print received documents:
1
Press the
(Menu)
button.
2
Press the button until
Job Status
is highlighted, and then press the
(Set)
button.
3
Press the button until
Secure Receive
is highlighted, and then press the
(Set)
button.
4
Enter the password, and then press the
(Set)
button.
The faxes stored in memory are printed.
To turn the secure receiving mode off:
1
Access the
Secure Receive Set
menu by repeating steps 1 to 6 in "To turn the secure receiving mode on:."
2
Press the button until
Disable
is highlighted, and then press the
(Set)
button.
3
To return to the previous screen, press the
(Back)
button.
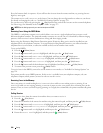
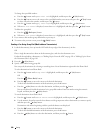
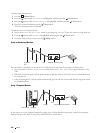
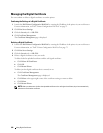
Using an Answering Machine
You can connect a telephone answering device (TAD) directly to the back of your printer as shown above.
• Set your printer to the
Ans Machine/Fax
mode and set
Auto Rec Ans/FAX
to specify the time for the
TAD.
• When the TAD picks up the call, the printer monitors and takes the line if fax tones are received and then starts
receiving the fax.
• If the answering device is off, the printer automatically goes into the fax receive mode after the ring tone sounds
for a predefined time.
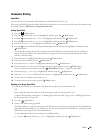
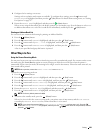
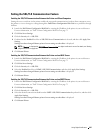
Using a Computer Modem
If you want to use your computer modem for faxing or for a dial-up Internet connection, connect the computer
modem directly to the back of your printer with the TAD as shown above.
To the wall
jack
Printer Line Telephone answering device Phone
To the Internet
Printer
Line
Telephone answering device Phone
Computer