


F-148 F-148
FULL VOLTAGE CALIBRATION(continued)
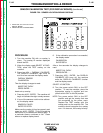
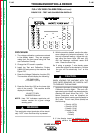
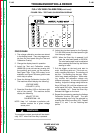
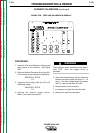
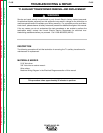
FIGURE F.55a - TEST AND CALIBRATION OVERLAY
TROUBLESHOOTING & REPAIR
PROCEDURE
1. The voltage calibration numbers are stored
in the display board. They are programma-
ble from the front panel using the Test and
Calibration Overlay.
2. Change the display board in question.
3. Install the Test and Calibration overlay
L9660-255 (or do not insert any overlay into
the machine) and power up the machine.
See Figure F.55a. If the -255 overlay is not
available, use Figure F.55a as a guide to see
which keys to press.
4. Press the Voltage Calibration function (32).
The machine should display the following:
VOLTAGE WIRE
+ POLARITY (+67A)
5. Press the Enter Key (133) on the lower right
side of the overlay. The machine should
display the following:
ADJUST TO 30V
CALIBRATION# = XX
NOTE: Here “xx” indicates a particular cali-
bration number for a given voltage
sense point.
The machine’s output terminals will be electri-
cally “HOT” when the Enter Key is pressed.
6. Adjust the wire feed speed on the Synergic
7 to 500 IPM (some wire feed speed to get
into the spray range).
NOTE: When the Enter Key is pressed it will
clear the wire feed speed to 200 IPM.
The wire feed speed must be adjusted
after pressing the Enter Key but before
starting to weld.
7. Pull the trigger on the torch and start to
weld. Hold a long stick out. This is not nor-
mally a welding technique. The starting will
be poor. The welding may be poor. Main-
tain a long, steady welding arc. While weld-
ing, monitor the reference voltage only
(external voltmeter). It is the only important
reading. Adjust the voltage using the Arrow
Keys (100 and 101) until the reference volt-
meter reads 30.0 volts. Record the number
on the display, “xx”. Press the Enter Key.
Release the trigger on the torch.
8. Repeat the process by pressing the Voltage
Calibration function (32) again. The next
voltage sensing point may be selected by
pressing the down Arrow Key (101). Repeat
steps 5, 6, and 7 for the following test
points.
POWER WAVE 450
Return to Section TOC Return to Section TOC Return to Section TOC Return to Section TOC
Return to Master TOC Return to Master TOC Return to Master TOC Return to Master TOC
WARNING