


Adding or Removing Hardware
262 Installation, Upgrades and Additions for Avaya CMC1 Media Gateways
Switch administration before hardware installation
Before inserting the circuit pack into a carrier, an Avaya representative must administer the VAL
customer options. Before installing the hardware, check your system for the following
administration:
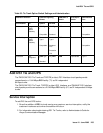
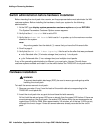
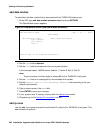
1. At the SAT, type display system-parameters customer-options and press RETURN.
The System Parameters Customer Options screen appears.
2. Verify that the G3 Version field is set to V11.
3. Verify that Maximum VAL Boards field is set to 1 or greater, up to the maximum number
allowed in the system.
Note:
Note: Any value greater than the default (1) means that you have the Enhanced offer.
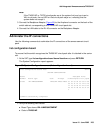
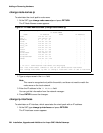
4. Scroll to page 4.
5. Verify that the VAL Full 1-Hour Capacity? field is set for the offer that was purchased:
● n for Standard offer (10 minutes storage time) and only 1 circuit pack.
● y for Enhanced offer (1 hour storage time) and multiple circuit packs.
If any of the preceding administration is different, you must get a License File with these
customer options enabled and install it on the switch before the TN2501AP circuit pack works.
Hardware installation
!
WARNING:
WARNING: To prevent electrostatic discharge (ESD), be sure to wear a grounding strap while
handling the circuit pack.
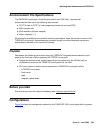
To install the announcement circuit pack:
1. Remove connector (if any) from the back of the switch cabinet corresponding to the
TN2501AP circuit pack slot.
2. Insert the circuit pack into any port slot and close the latch securely.
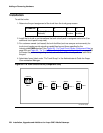
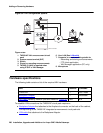
At first, both the red and green LEDs are on steady, then the green LED flashes. If there are
announcements on the circuit pack, the amber LED flashes while the announcements are
copied from FLASH to RAM. After approximately 3-5 minutes, all of the top 3 LEDs go out,
although this time is longer if there are announcements already recorded on the circuit
pack.